Loco 1.0 Theme Information
The Loco is a Premium Directory/Listing WordPress Theme, For Classified & Directory and Listing websites. super flexible and has a fully responsive design. A lot of thought and care were put into Loco making it a pleasure to use. We carefully handcrafted this Theme with a strong focus on typography, usability and overall user-experience.
What is included in the price?
- Premium Plugins (Loco Helper, LayerSlider)
- Theme Documentation
- Premium Support - To our support forum.
None of the images and partner logos inside the demo are included inside the download package. The download package contains a single demo image and dummy logo image.
Loco Theme Installation
Installing the theme can be done two ways. You can upload the theme ZIP file using the built in WordPress theme upload, or copy the files through an FTP client.
When you download the theme from Themeforest, you will get an archive file in .zip extension. You need to unzip that archive. When done, you will see folders.
Please, follow the steps below to install via WordPress Dashboard
- Step 1 - Login to your WordPress Dasrdoard.
- Step 2 - Go to Appearance > Themes. Click Add new button, located at the top of the screen or Add new theme ( see screenshots below ).

- Step 3 - Click On "Install Now" button and wait.
- Step 4 - Click on "active" theme
Please, follow the steps below to install via FTP
- Step 1 - Login to your FTP server and navigate to your WordPress themes directory. Normally this would be "wp-content/themes"
- Step 2 - Unzip the files from the zipped theme.
- Step 3 - Open it and inside the extracted folder select your theme and upload it to your "wp-content/themes" directory.
- Step 4 - After the files are finished uploading, login to your WordPress admin.
- Step 5 - In the "Appearance" menu click "Themes".
- Step 6 - Click "Activate" for the theme "Loco"
Common Theme Installation Problems
"Are you sure you want to do this?"
If you get the “Are you sure you want to do this” message when installing Loco.zip file via WordPress, it means you have an upload file size limit. Install the theme via FTP if this happens, or ask your hosting company to increase the limit.
Missing stylesheet file
If you get an error saying that the stylesheet is missing, then you have uploaded the wrong folder. Please check that you are uploading the Loco.zip within the Theme Files folder. You have to unzip the file that you download from Themeforest to find this.
Install/Active Plugin
After activating Theme you will notify to Install/active Plugin
You can install all plugin on one Click just select all and select option Install.
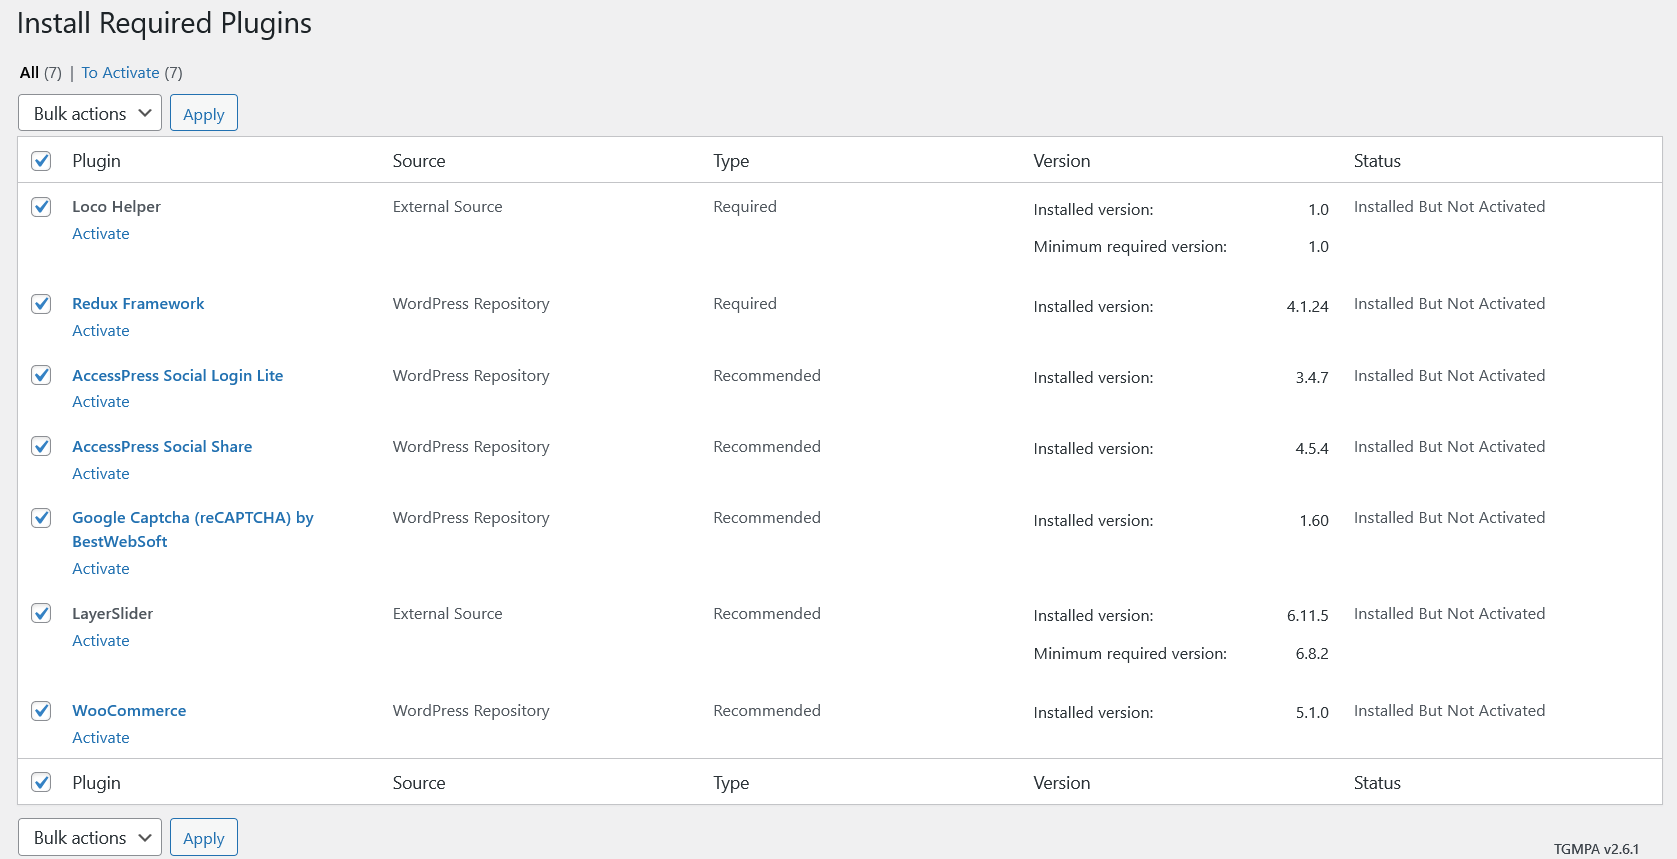
- Redux Framework - You must need to Install and active this plugin."
- Loco Helper - You must need to Install and active this plugin."
- AccessPress Social Login WordPress Plugin - If you want to use Social Login option then you need to install this plugin otherwise no need.
- AccessPress Social Share WordPress Plugin - IF you want to use Share option then you need to install this plugin otherwise no need.
- WooCommerce - Optional , Use this plugin if you want to use Pricing Plans for Listing Posting or shop in your website.
- One Click Demo Importer - Optional , We have used this plugin for just import demo, After to import demo, You need to uninstall this plugin.
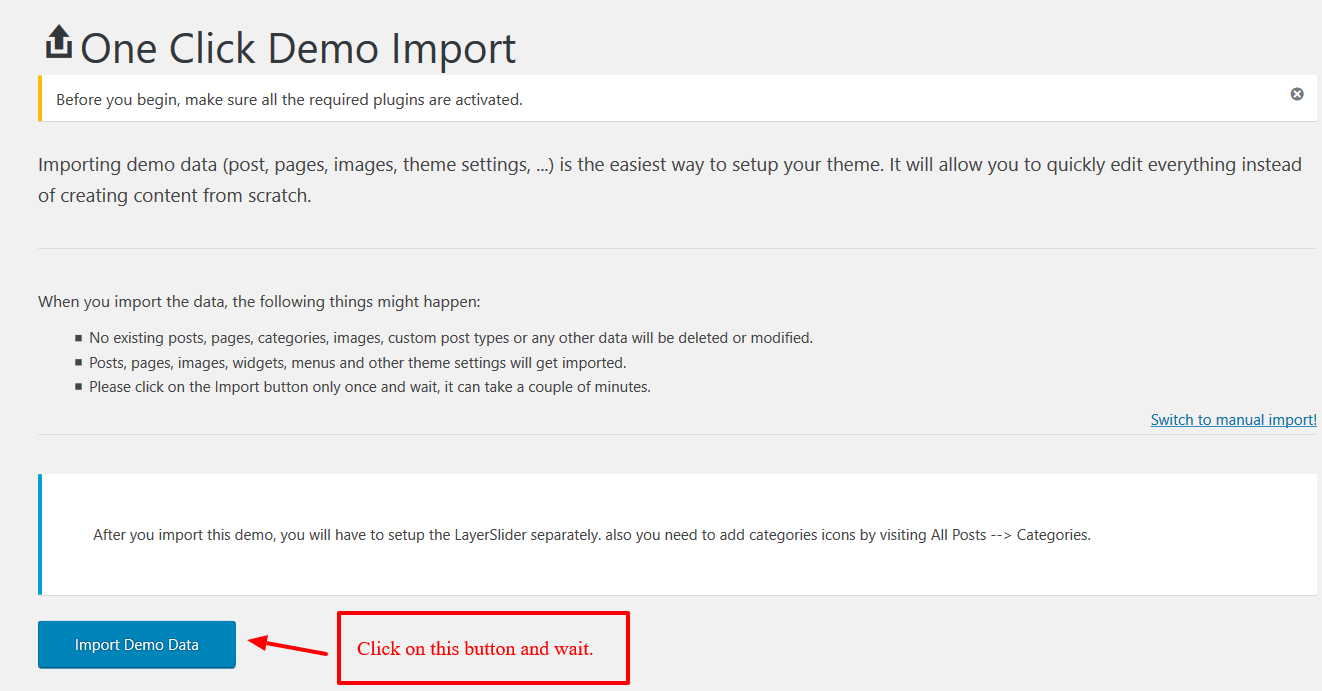
Install / Import Dummy data
Before to Import dummy data, Please make sure you have installed these plugins. These Plugins are required
- Loco helper - Important
- Redux Framework - Important
If you have installed these plugin then follow these steps.
- Step 1 - Come to WordPress Dashboard
- Step 2 - Come to Appearance
- Step 3 - Here you will see option for Import demo data
- Step 4 - Click on Import demo data and wait.
For More help take a look at this screenshot.
Setup Categories Images and icons
Categories Icons will not import with dummy content you must need to setup categories icons after to setup dummy content.
To setup categories icons go to WordPress Dashboard --> Listings -> Categories. Click on main category and there you'll have custom field for category image, and upload image for MAP Pin.
Here are some example which we have used in our demo.
In Dummy content folder we have also include some icons for MAP with categories name, So you can also use that. For more help take a look at this image.
Loco Theme Options:
After to install and active plugin and import demo content then you need to select Loco Options -> To Change theme default setting. And Change LOGO and other settings as per you need.
General Settings
From General settings we can upload website LOGO, and some other settings.
- Logo: Used on all over the website , Best size is 120x60px
- Offcanvas Logo: This logo image will be used for Mobile Navigation.
- Dashboard Logo: This logo image will be used on Author Front-end Dashboard.
- Login/Register Logo:As per our design we have used icon base logo for login/register page.
- Tags number:How many tags do you want to show in the widget area all over the website.
- Listing Slug:You can change "Listing" Word from URL for single listing post.
- Listing Category Slug:You can change Listing Categories slug.
- Listing features Slug:You can change listing features slug from here
- Listing Location Slug:You can change listing location slug from here
- Currency Tag:Select a currecny which will work on your all over the website.
- Currency Tag Display:Select currecny tag position.
- Terms And GDPR URL:This link will display on your register form and your contact form all over the website.
- Copyright : From here you can change your website copyrights.
For details please take a look at this screenshot.

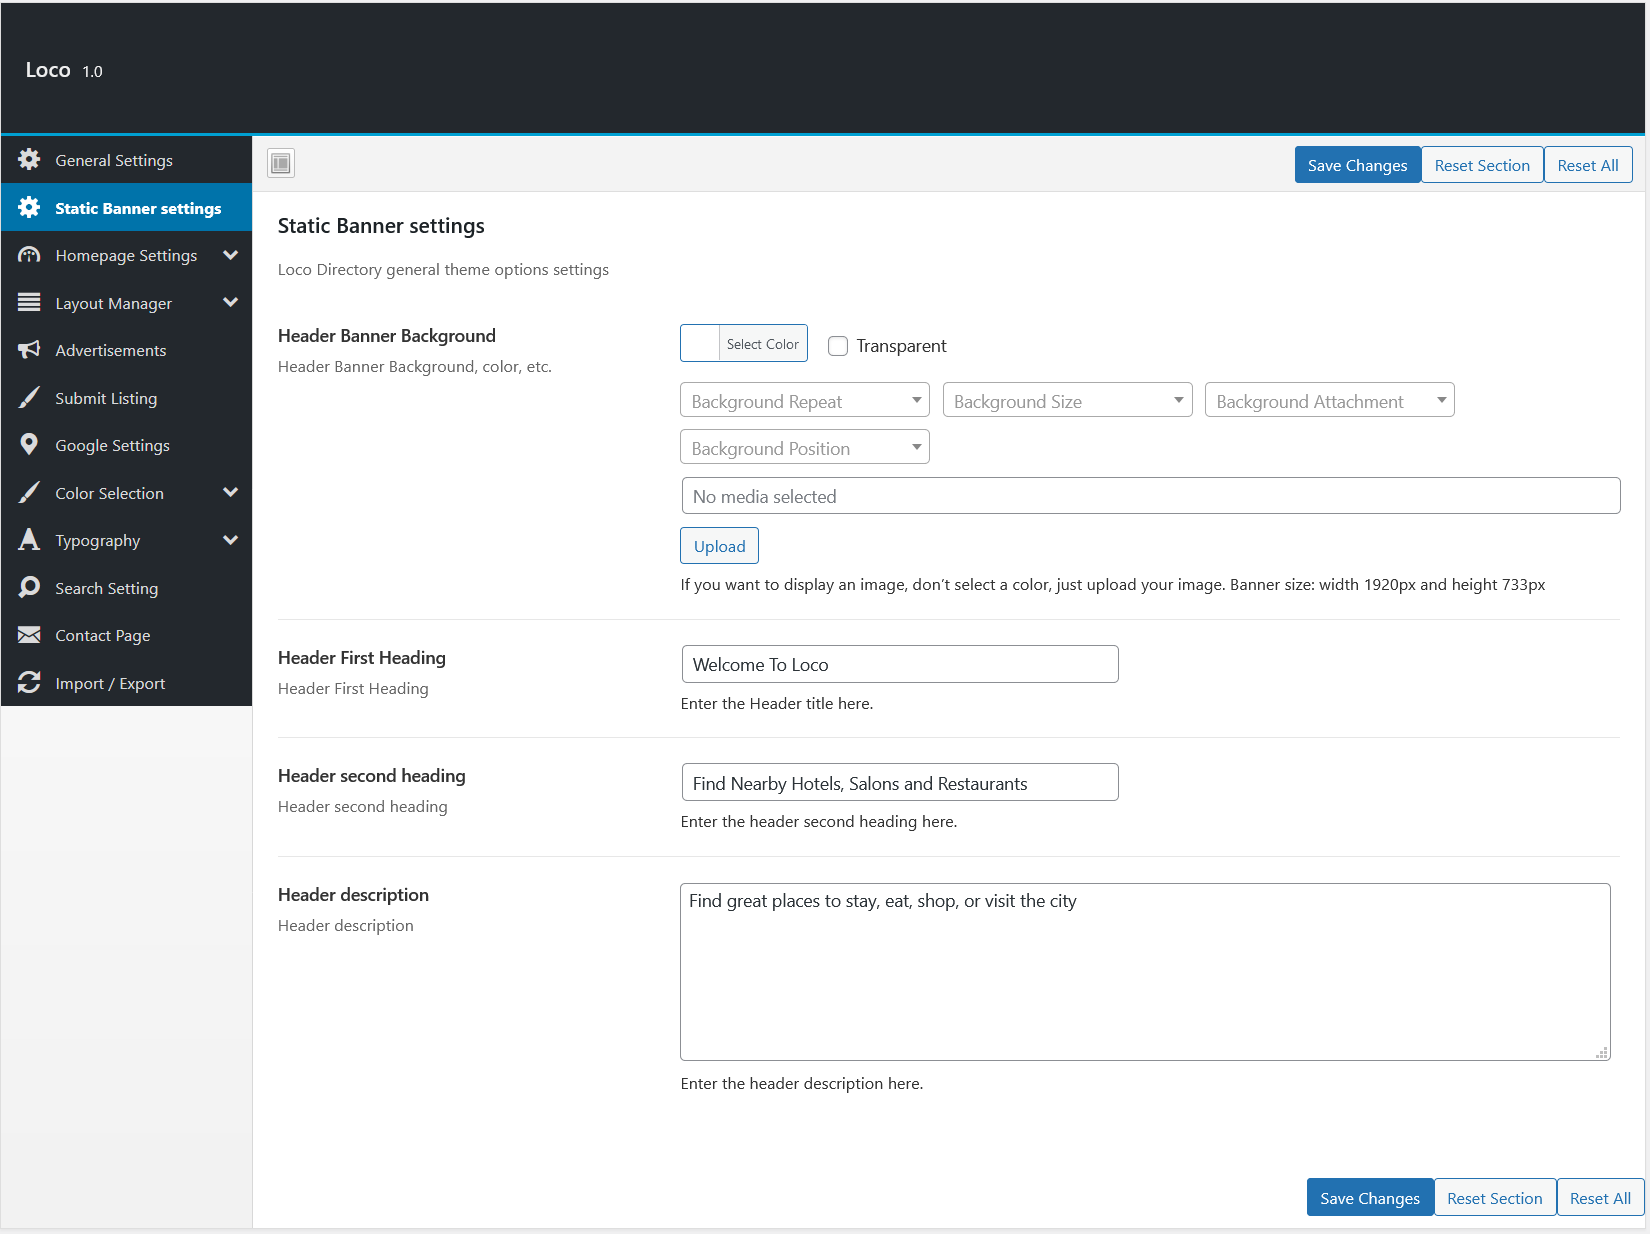
Static Banner Settings
On homepage we are using a Hero header with hero image, From here you can upload banner image and can replace header text.
For header banner image you can also manage these options.
- Background Repeat: No Repeat, Repeat All, Repeat Horizontally, Repeat Vertically, Inherit.
- Background Size: Inherit, Cover, Contain
- Background Attachment: Fixed, Scroll, Inherit
- Background Position: Left top, Left Center, Left Bottom, Center Top, Center Center, Center Bottom, Right Top, Right Center, Right Bottom.
For details have a look at this image.
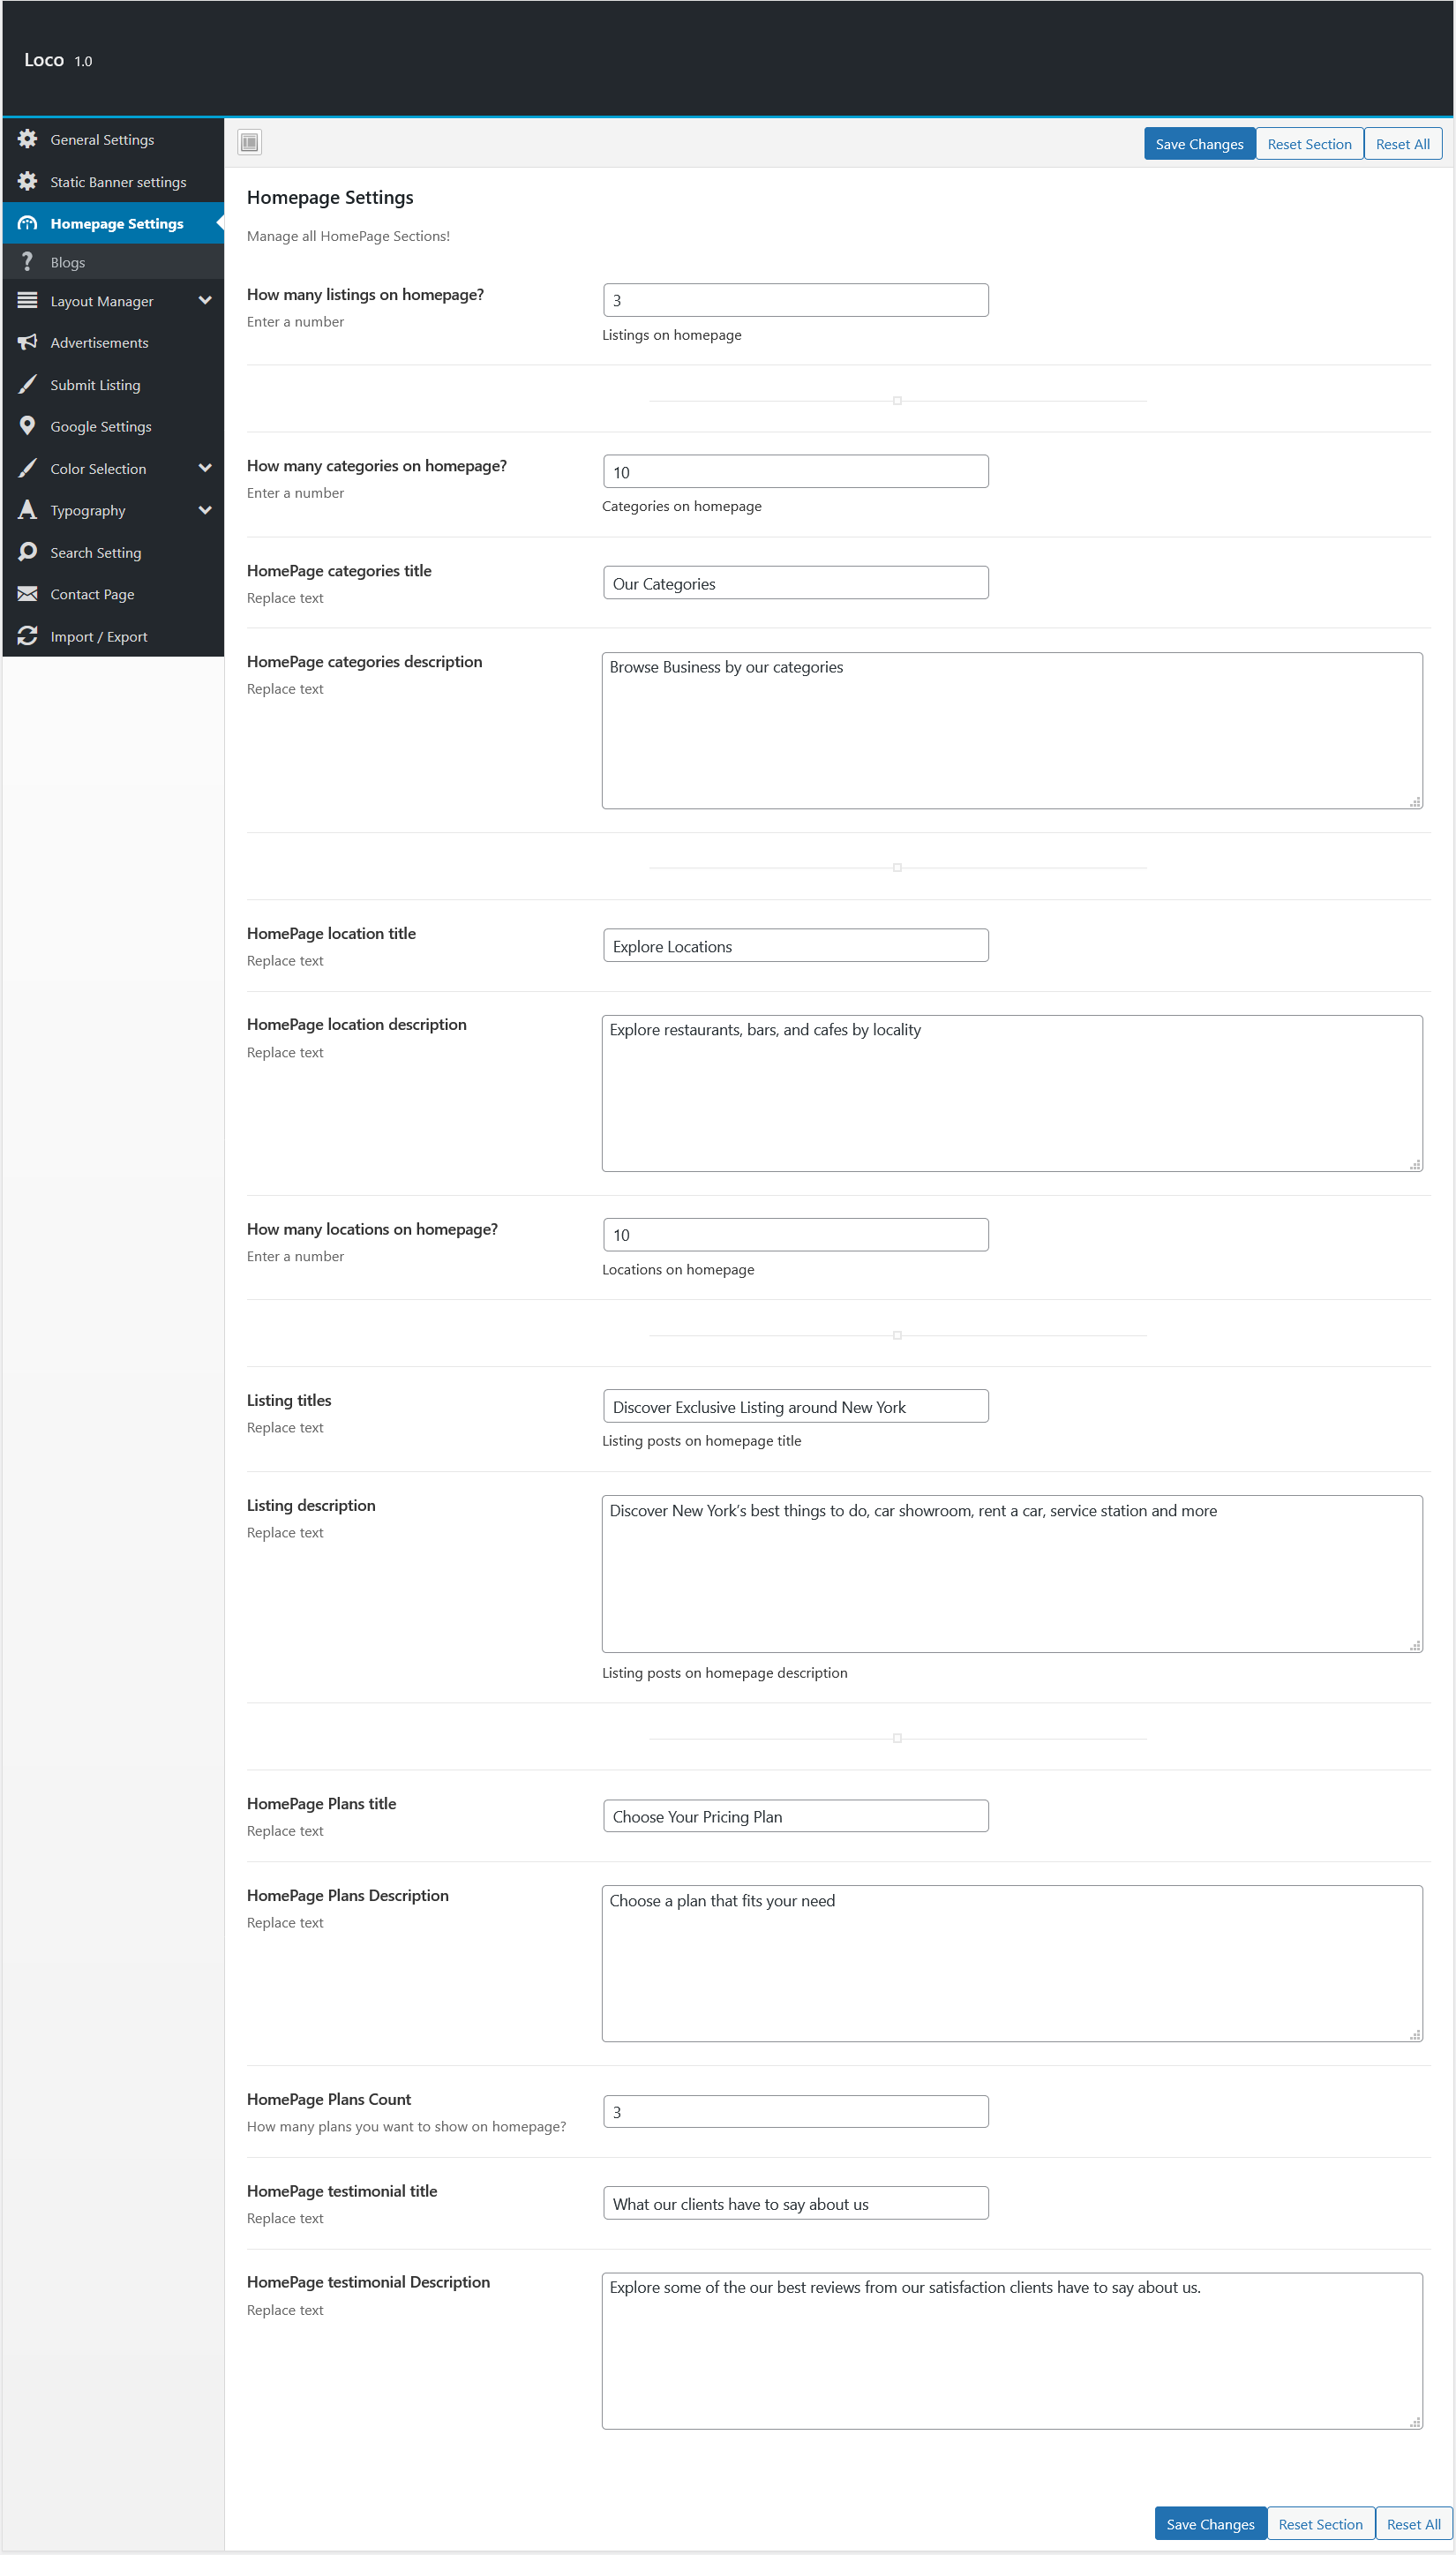
Homepage Settings
In Home page settings you will see option to change description and title for your all sections.
- How many listings on homepage?: From here you can manage how many listing you want to show on homepage.
- How many categories on homepage?: From here you can manage how many categories you want to show on homepage.
- How many locations on homepage?: From here you can manage how many locations you want to show on homepage.
For details have a look at this image.
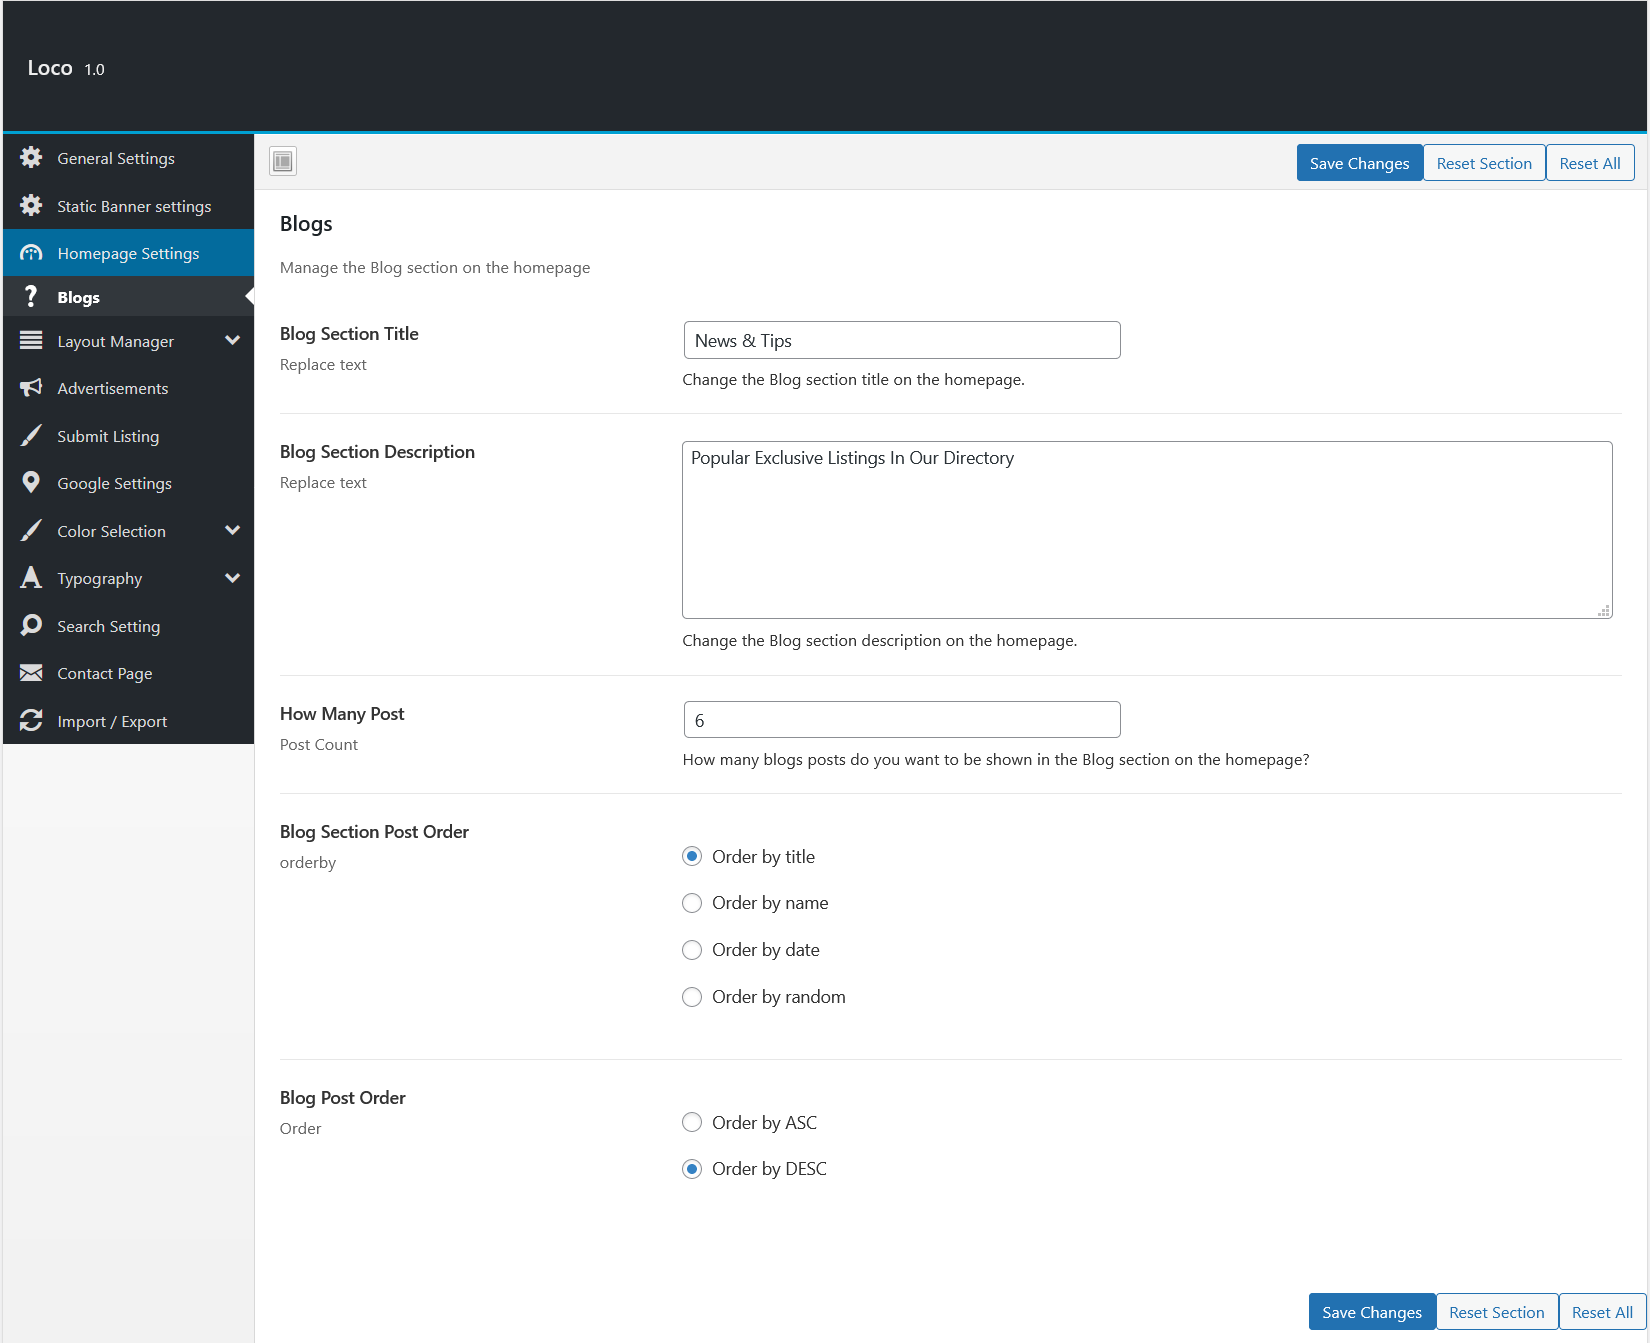
Blogs
From here you can manage blogs section heading , description, and post order.
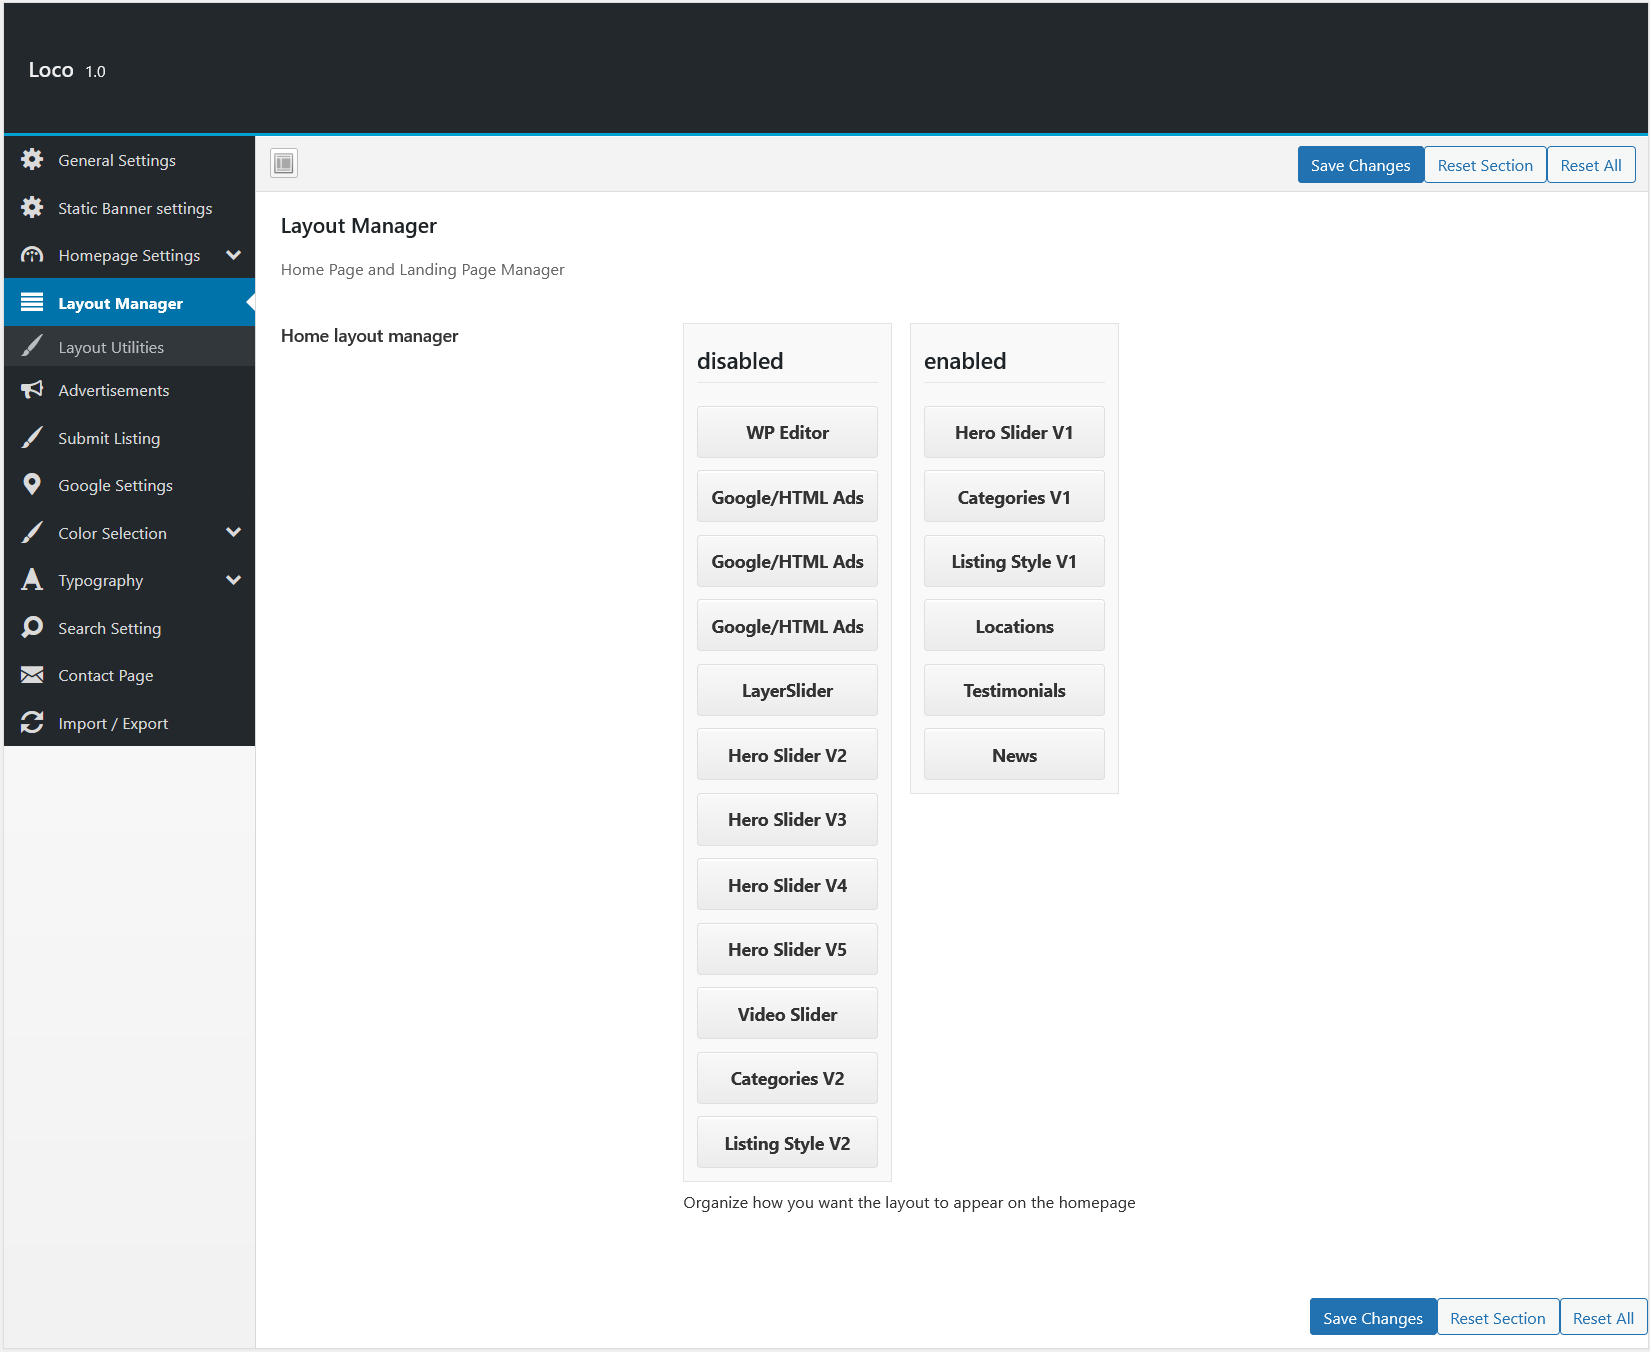
Layout Manager
From Layout Manager you can manage which section you want to show on your homepage, You can simply drag/drop any section for enable or disable.
If you want to remove any section then you need to drag section to disable section. If you want to add section then you need to drag in enabled section.
- WP Editor: If you want to use WordPress Editor for your custom modification, or if you want to use Elementor Editor Plugin then you need to enable this section.
- Google/HTML Ads: If you want to display Google Ads or HTML ads on your homepage then you need to drag these sections on homepage. After to drag this section in enabled section you can insert your ads code in Loco Options --> Advertisements.
- Hero Slider: We have 4 Hero Header styles, You can use as per you need.
- LayerSlider: If you want to use LayerSlider on your home page then you need to drag this to enabled section.
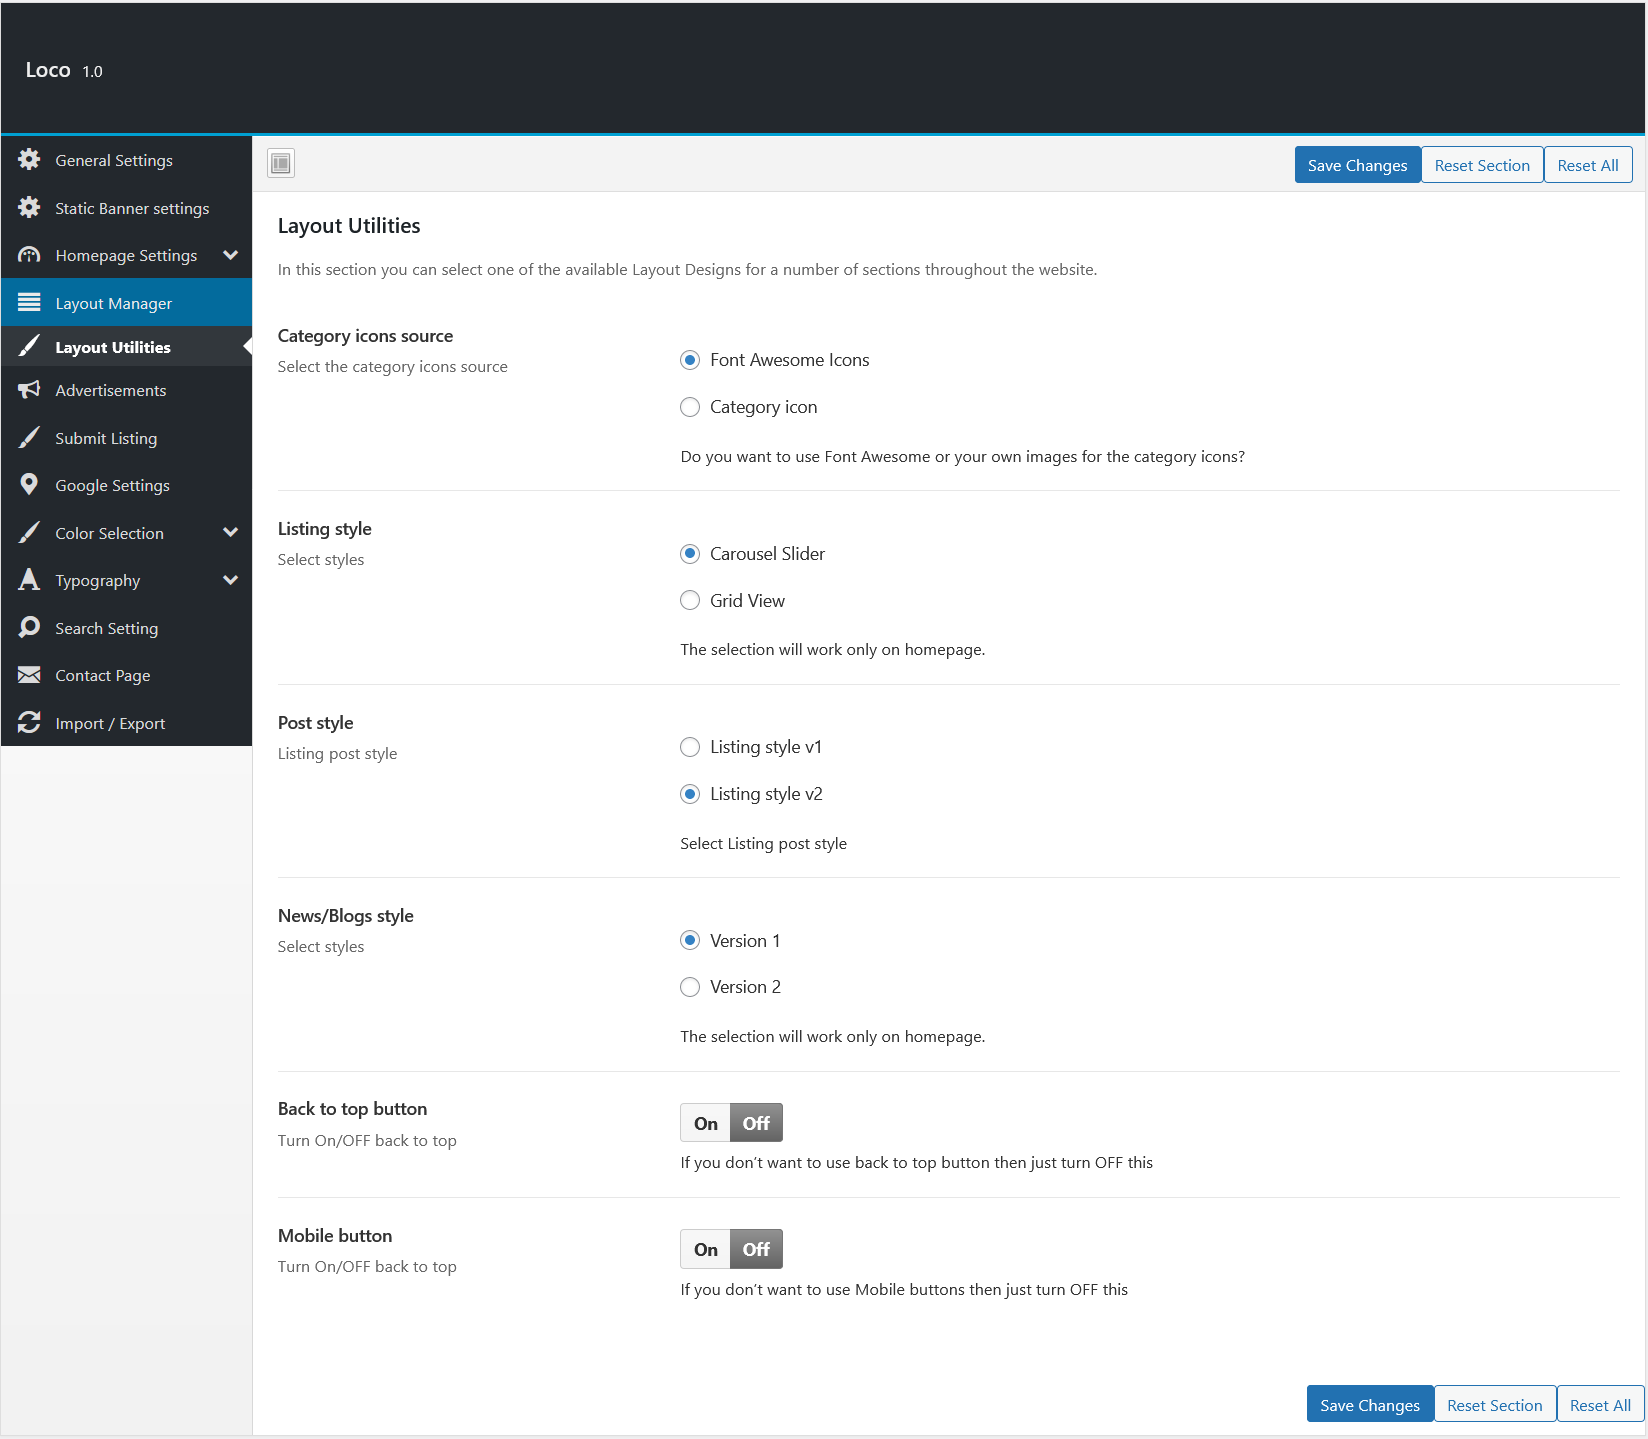
Layout Utilities
From Layout Utilities you can manage layout basic settings.
- Category icons source: for categories we have option to use your own designed image icon or you can use icon code from FontAwesome.
- Listing style: We have 2 options (Carousel Slider, Grid View) for listings on home page. You need to select one option as per your need.
- Post style: We have two listing style.(Style 1, Style 2)
- Blog Style: We have two Blogs post style.(Style 1, Style 2)
- Mobile Buttons: We have some Mobile button in footer, You can remove that button by turnign OFF this option.
For details have a look at this image.
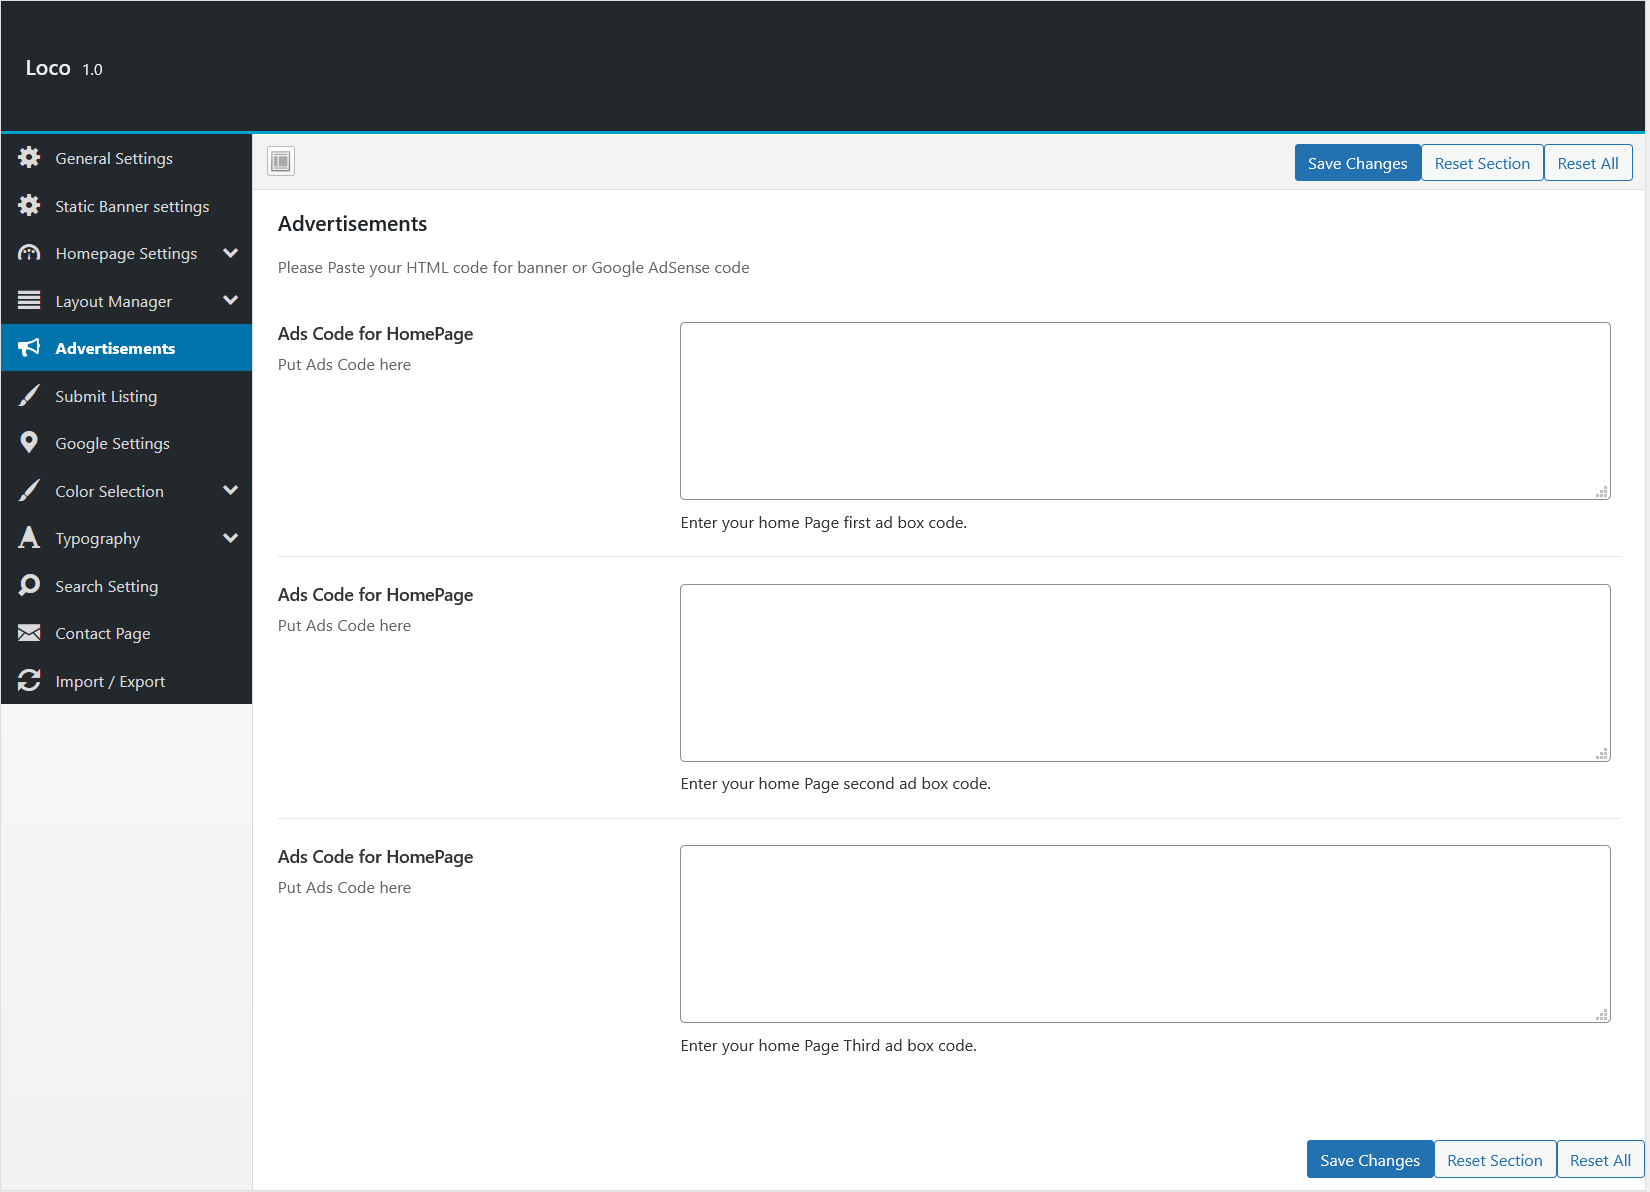
Advertisements
We have option to display Google AdSense ads or Image banner ads or any other HTML based ads on homepage, You can display three banner on homepage as per Google Rules, For more banners you can use WordPress Editor Option.
Submit Listing
From here you can manage Submit Listing page.

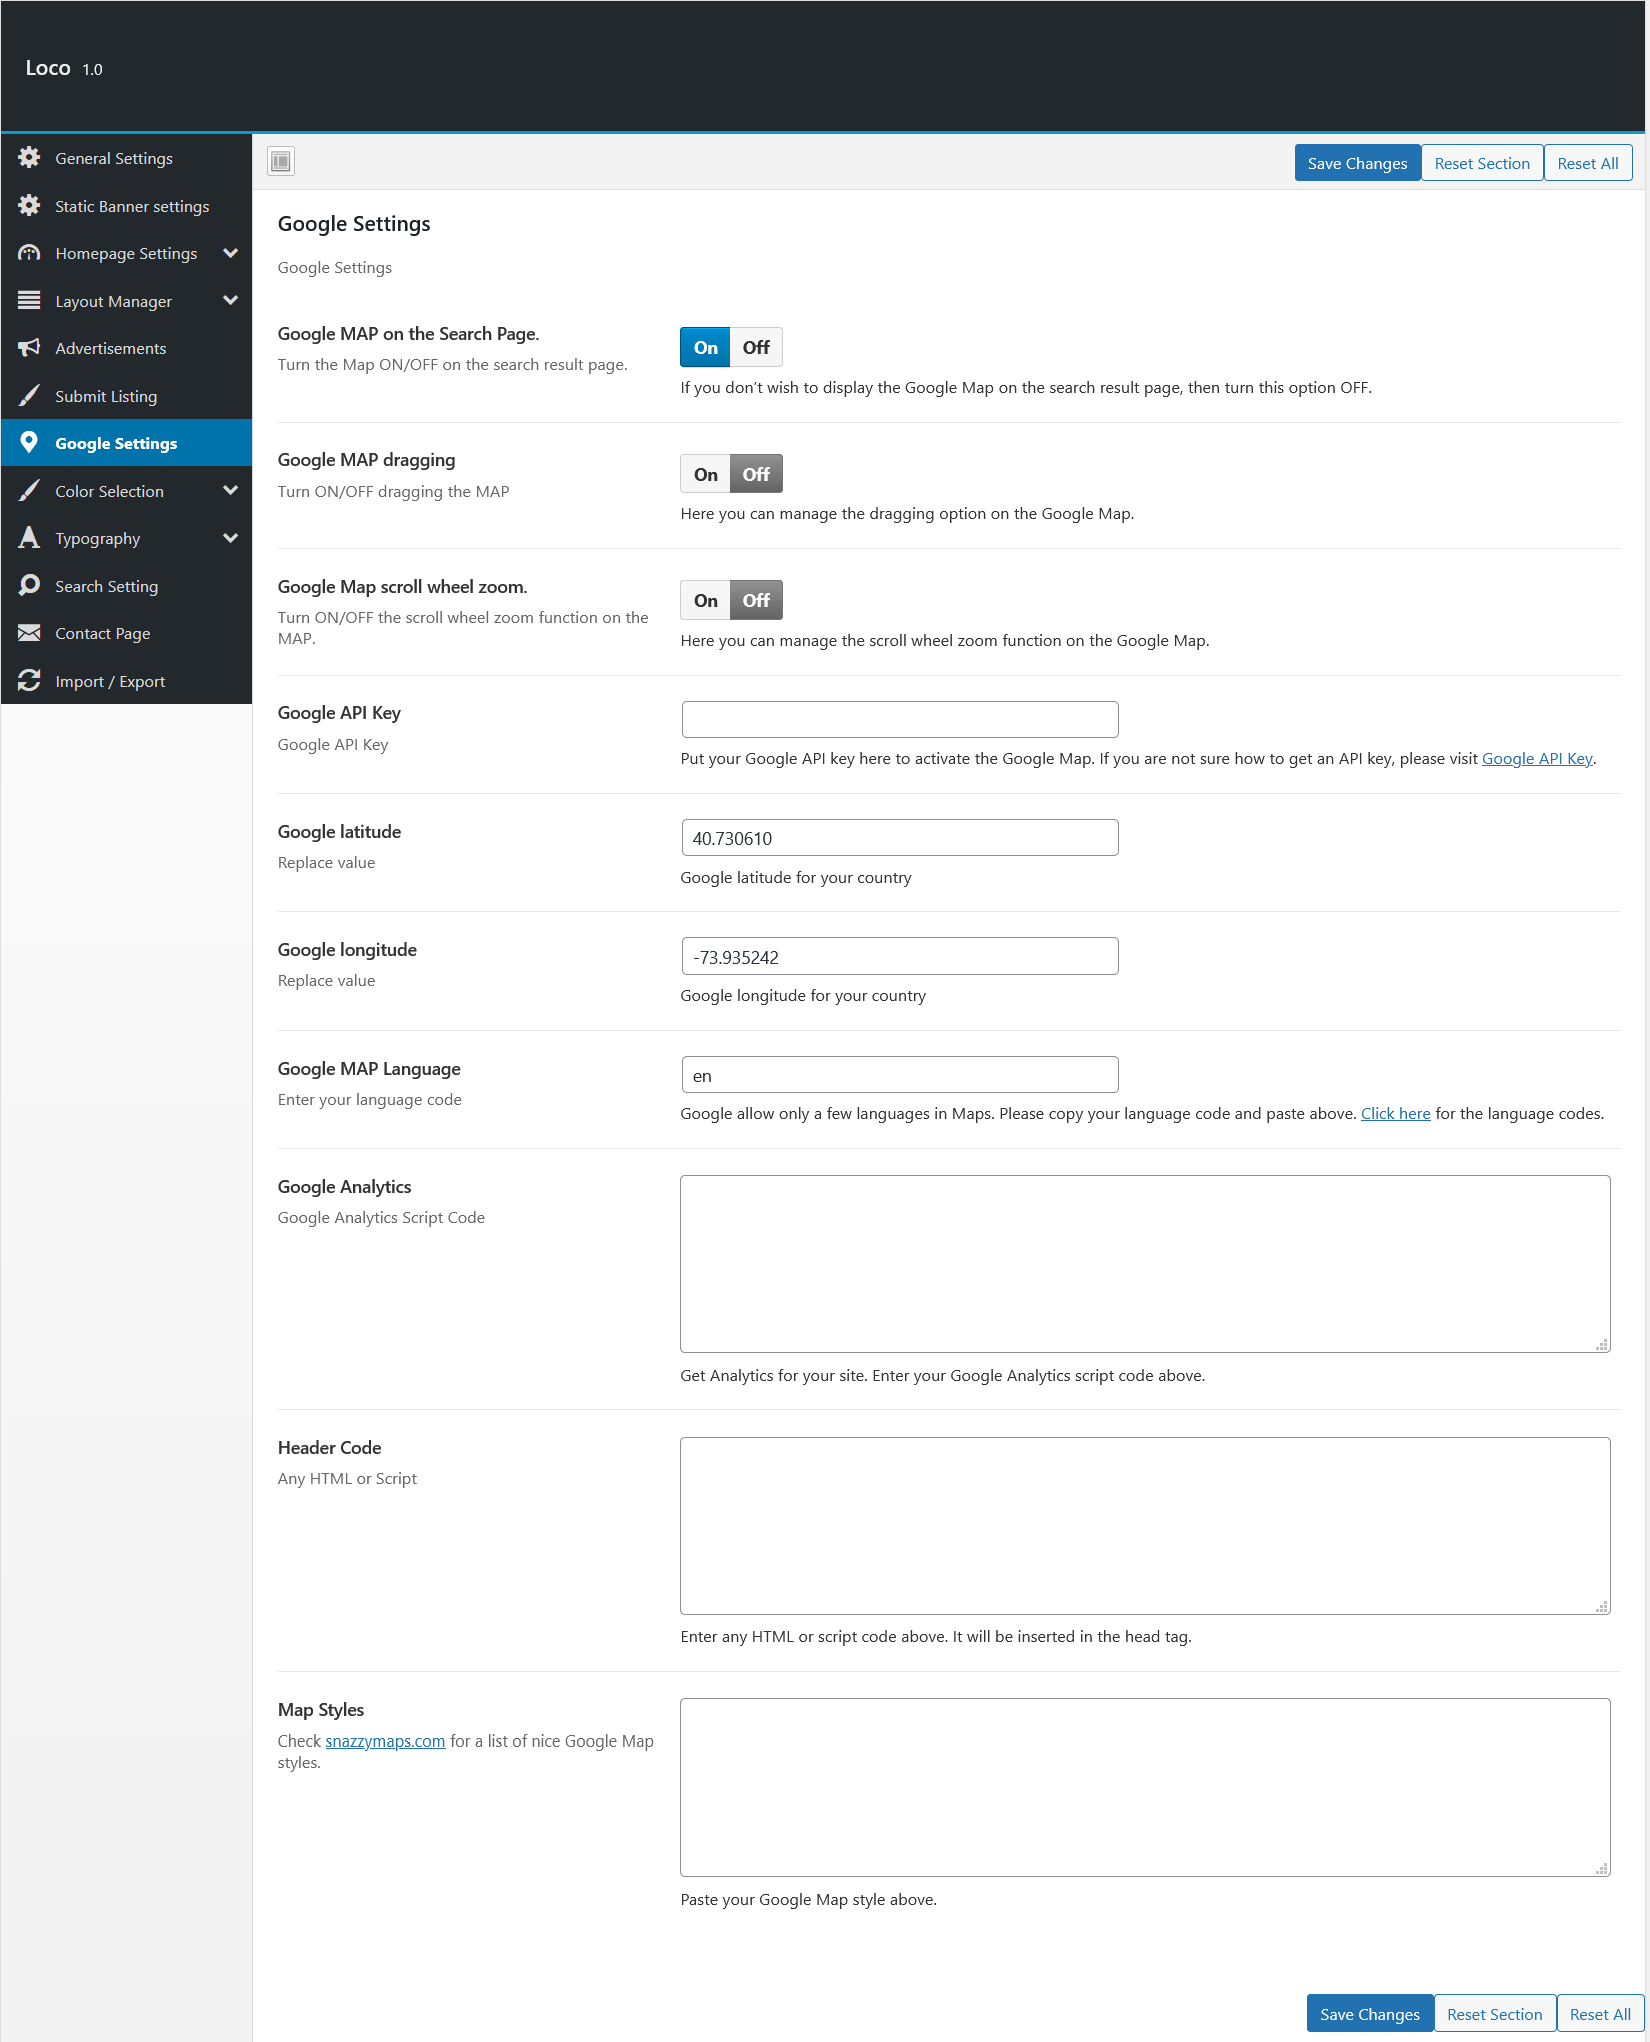
Google Settings
From Google settings you need to replace your Google API key and your Latitude and Longitude for Google MAP display, From here you can also manage Google Analytic and Map Styles by snazzymaps
- Google API Key - You must need to enter your Google MAP API key to use Google MAP. Click Here to get API Key.
- Google MAP on the Search Page - If you will trun OFF this option then Google MAP will be removed from your search page.
- Google MAP dragging - If you will trun OFF this option then drag option will be removed.
- Google latitude & Longitude - If you will provide Google latitude & Longitude of your country then On Submit Listing page MAP will be shown from your country.
- Google MAP Language - By default we have shown Google MAP in English, But if you want to change your MAP langauge then you need to provide your langauge code.Click here to see all list of supported languages.
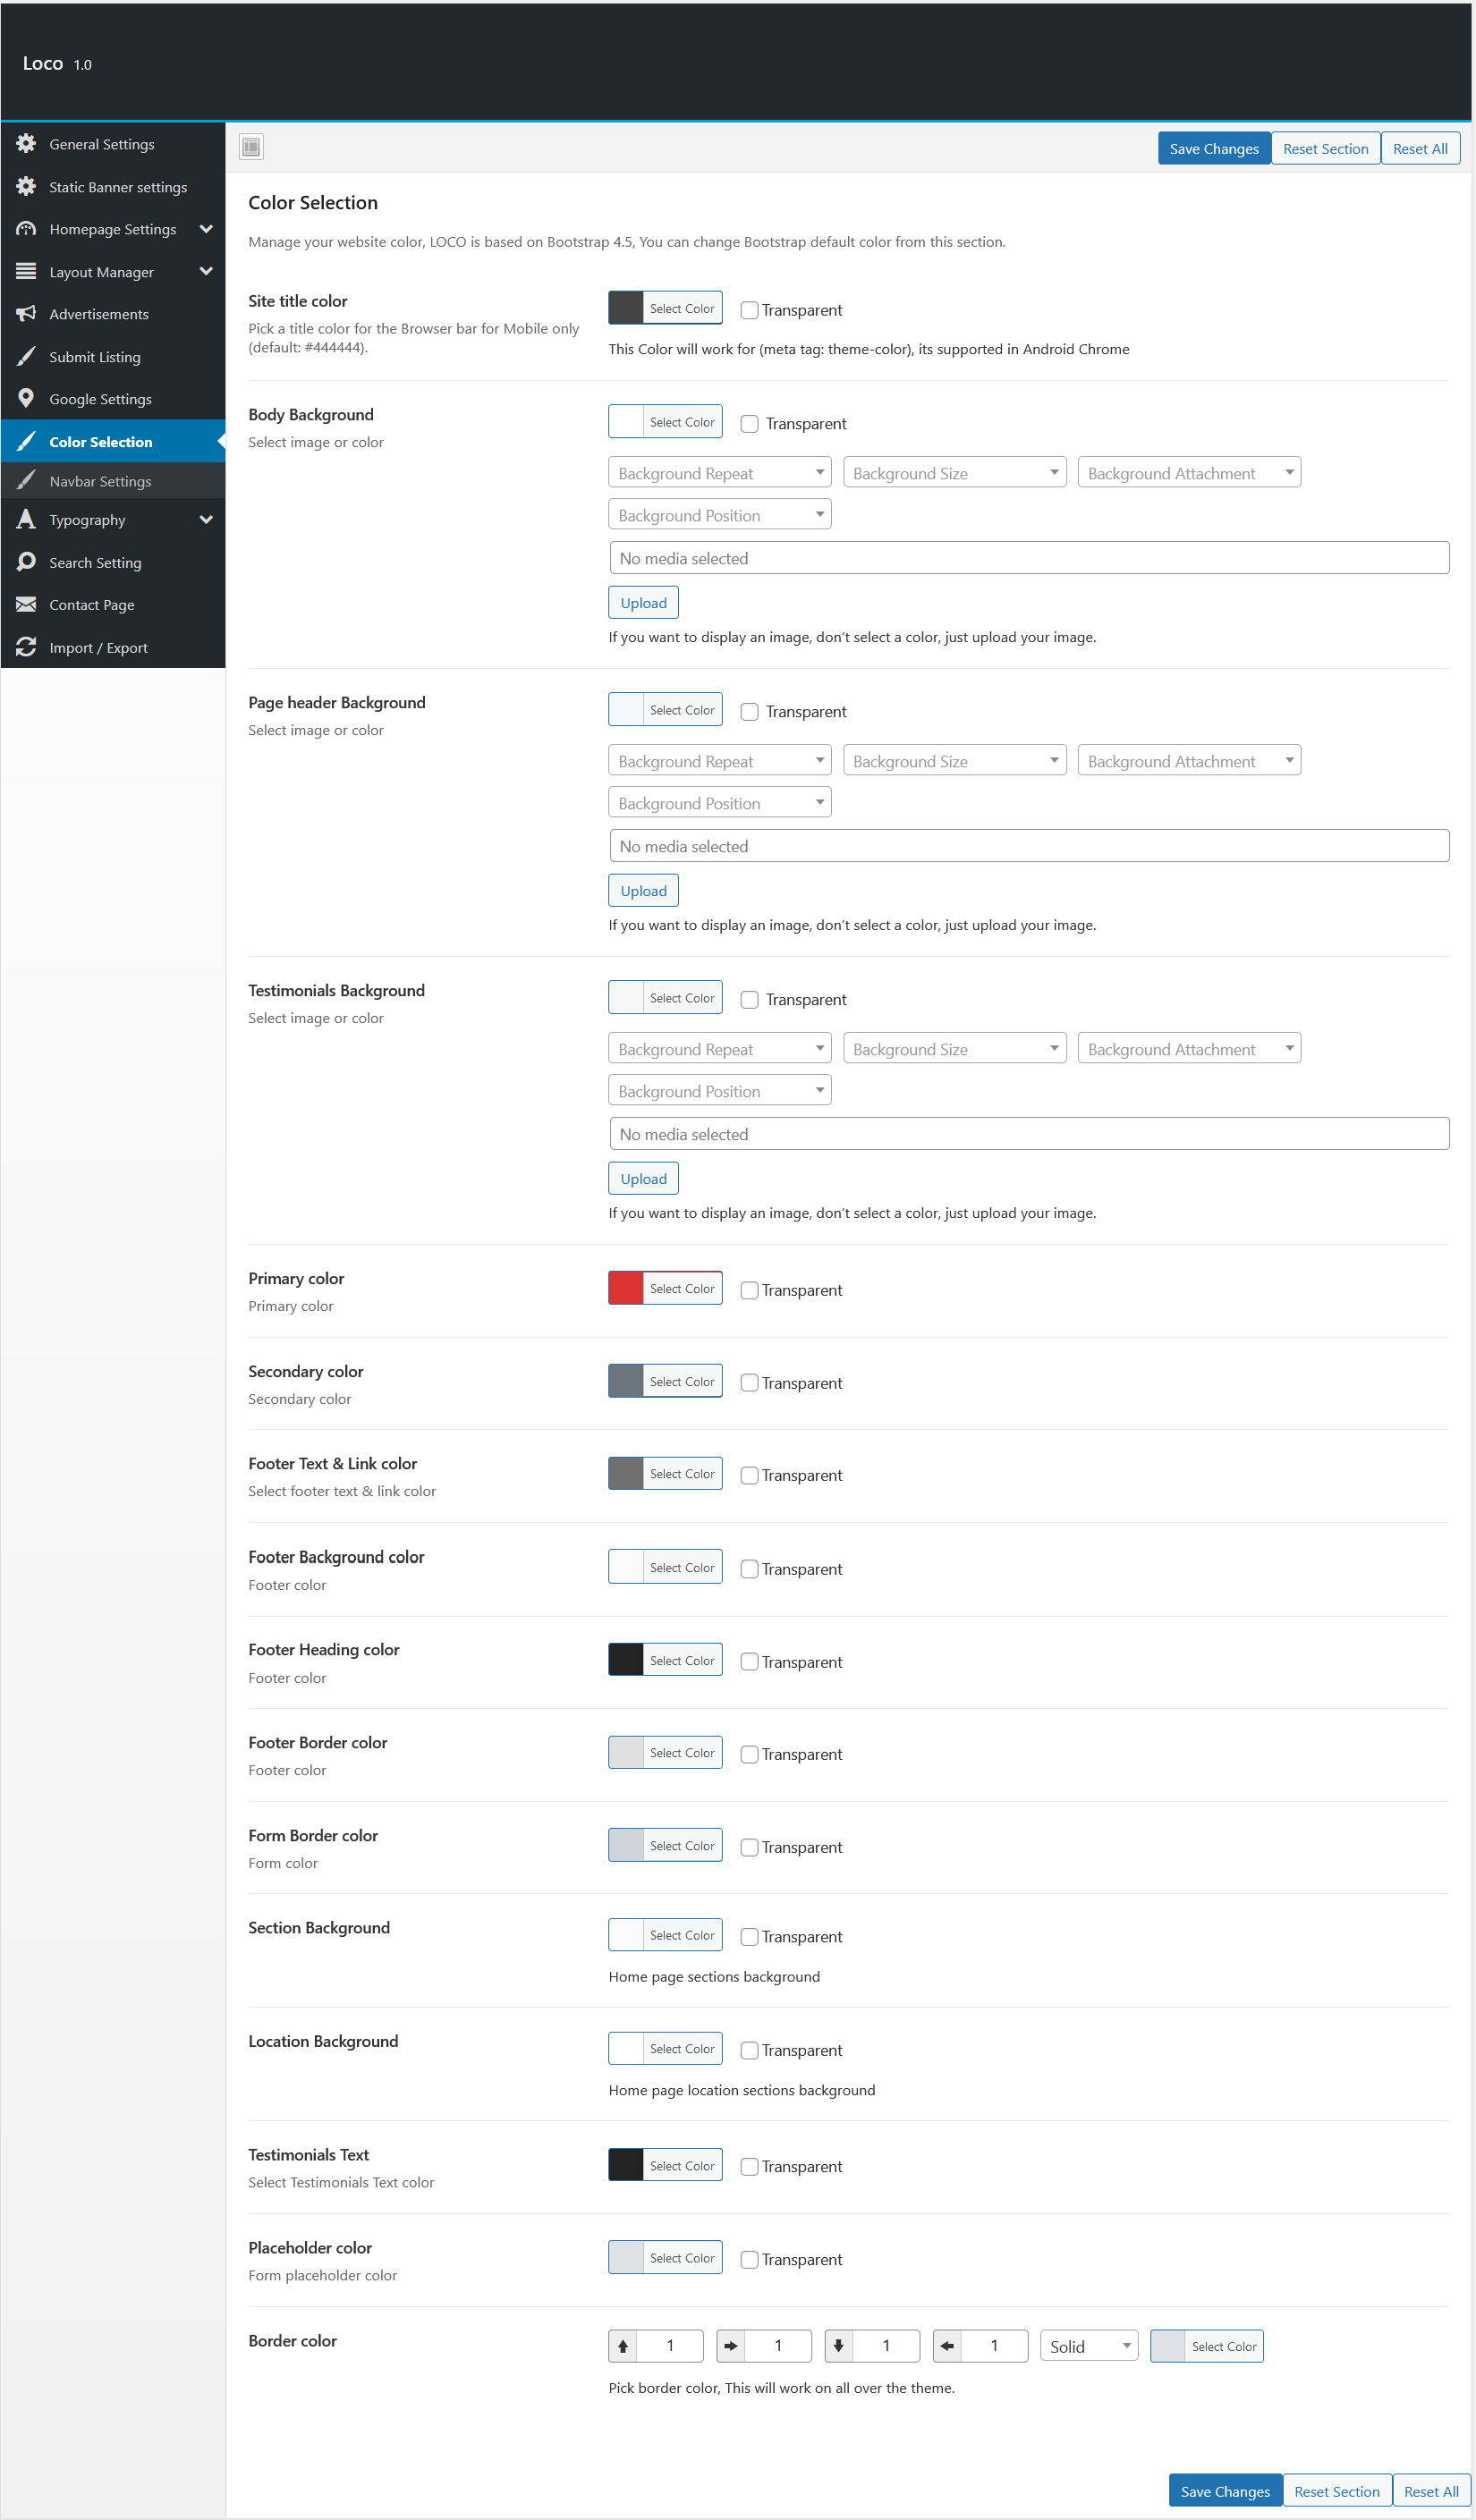
Color Selection
From here we can manage website color scheme.
- Site title color - This Color will work for (meta tag: theme-color), its supported in Android Chrome.
- Body Background - Here you cna use color or background image for your website body.
- Page header Background - For page header you can use background image or color, Blow you can see page header image to get idea.

- Testimonials Background - In Testimonials section you can use color or background image.
- Other colors option - Other colors option have related names and that's are basic colors.
For details have a look at this image.
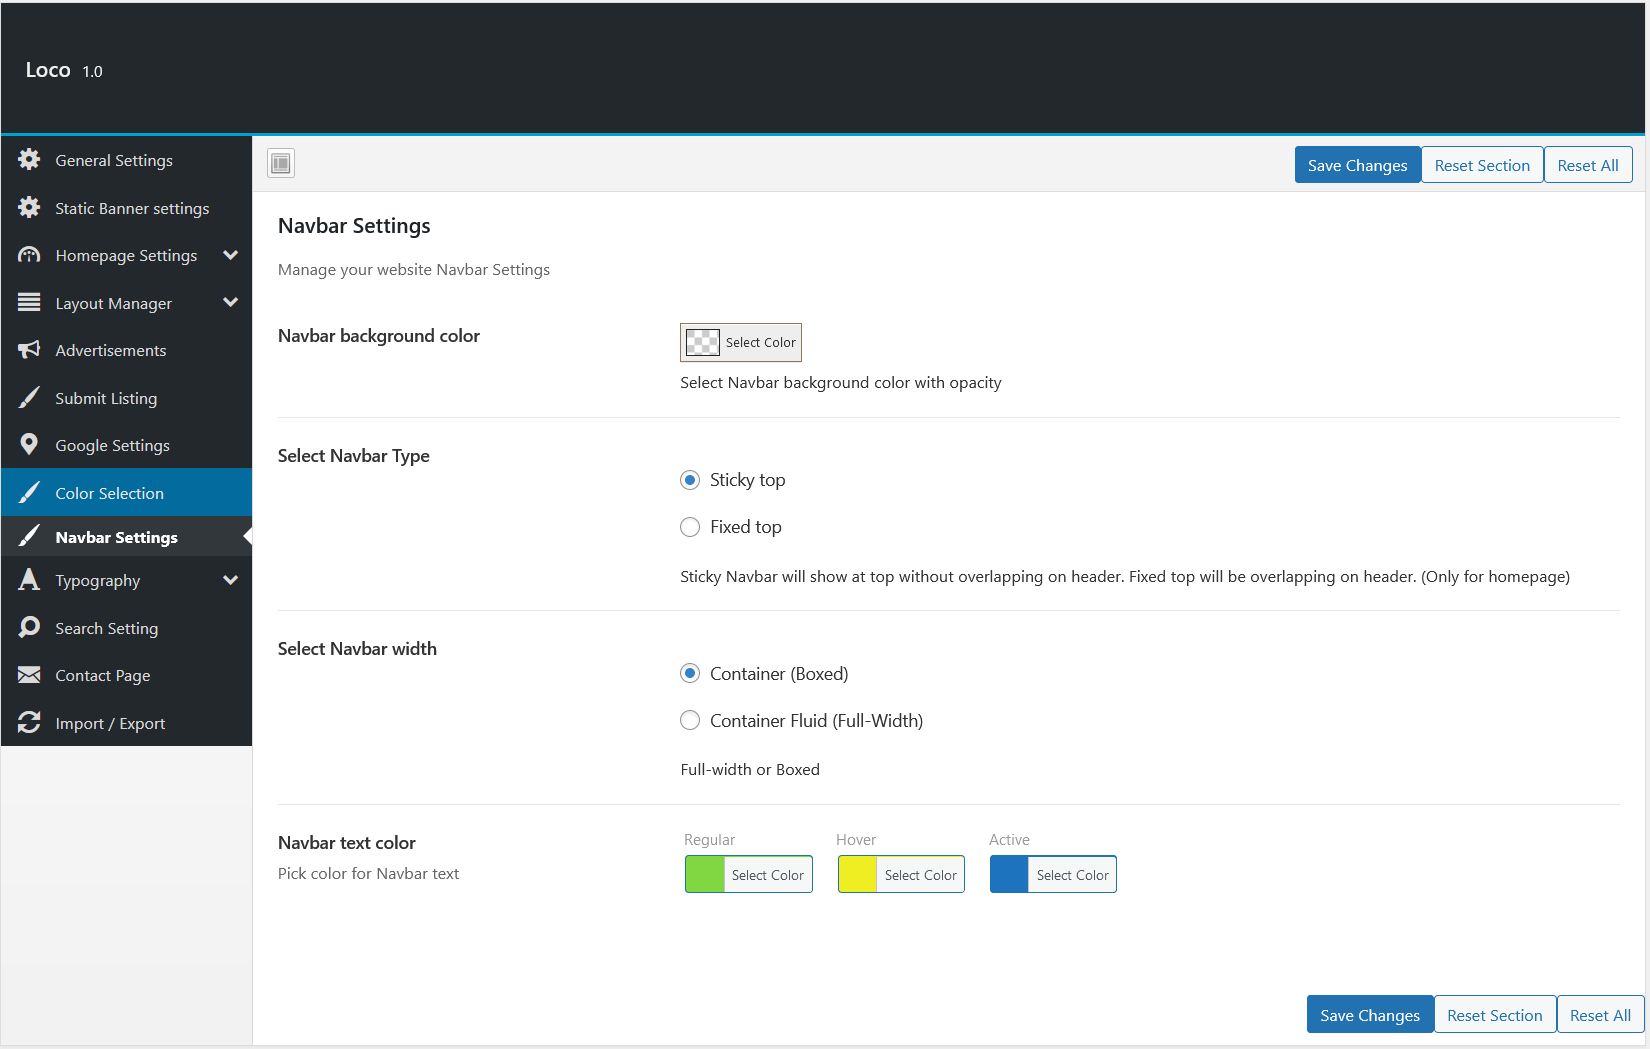
Navbar Settings
From Navbar Settings you can select Full-width or boxed only for navbar section and you can choose colors and other settings. For details have a look at this image.
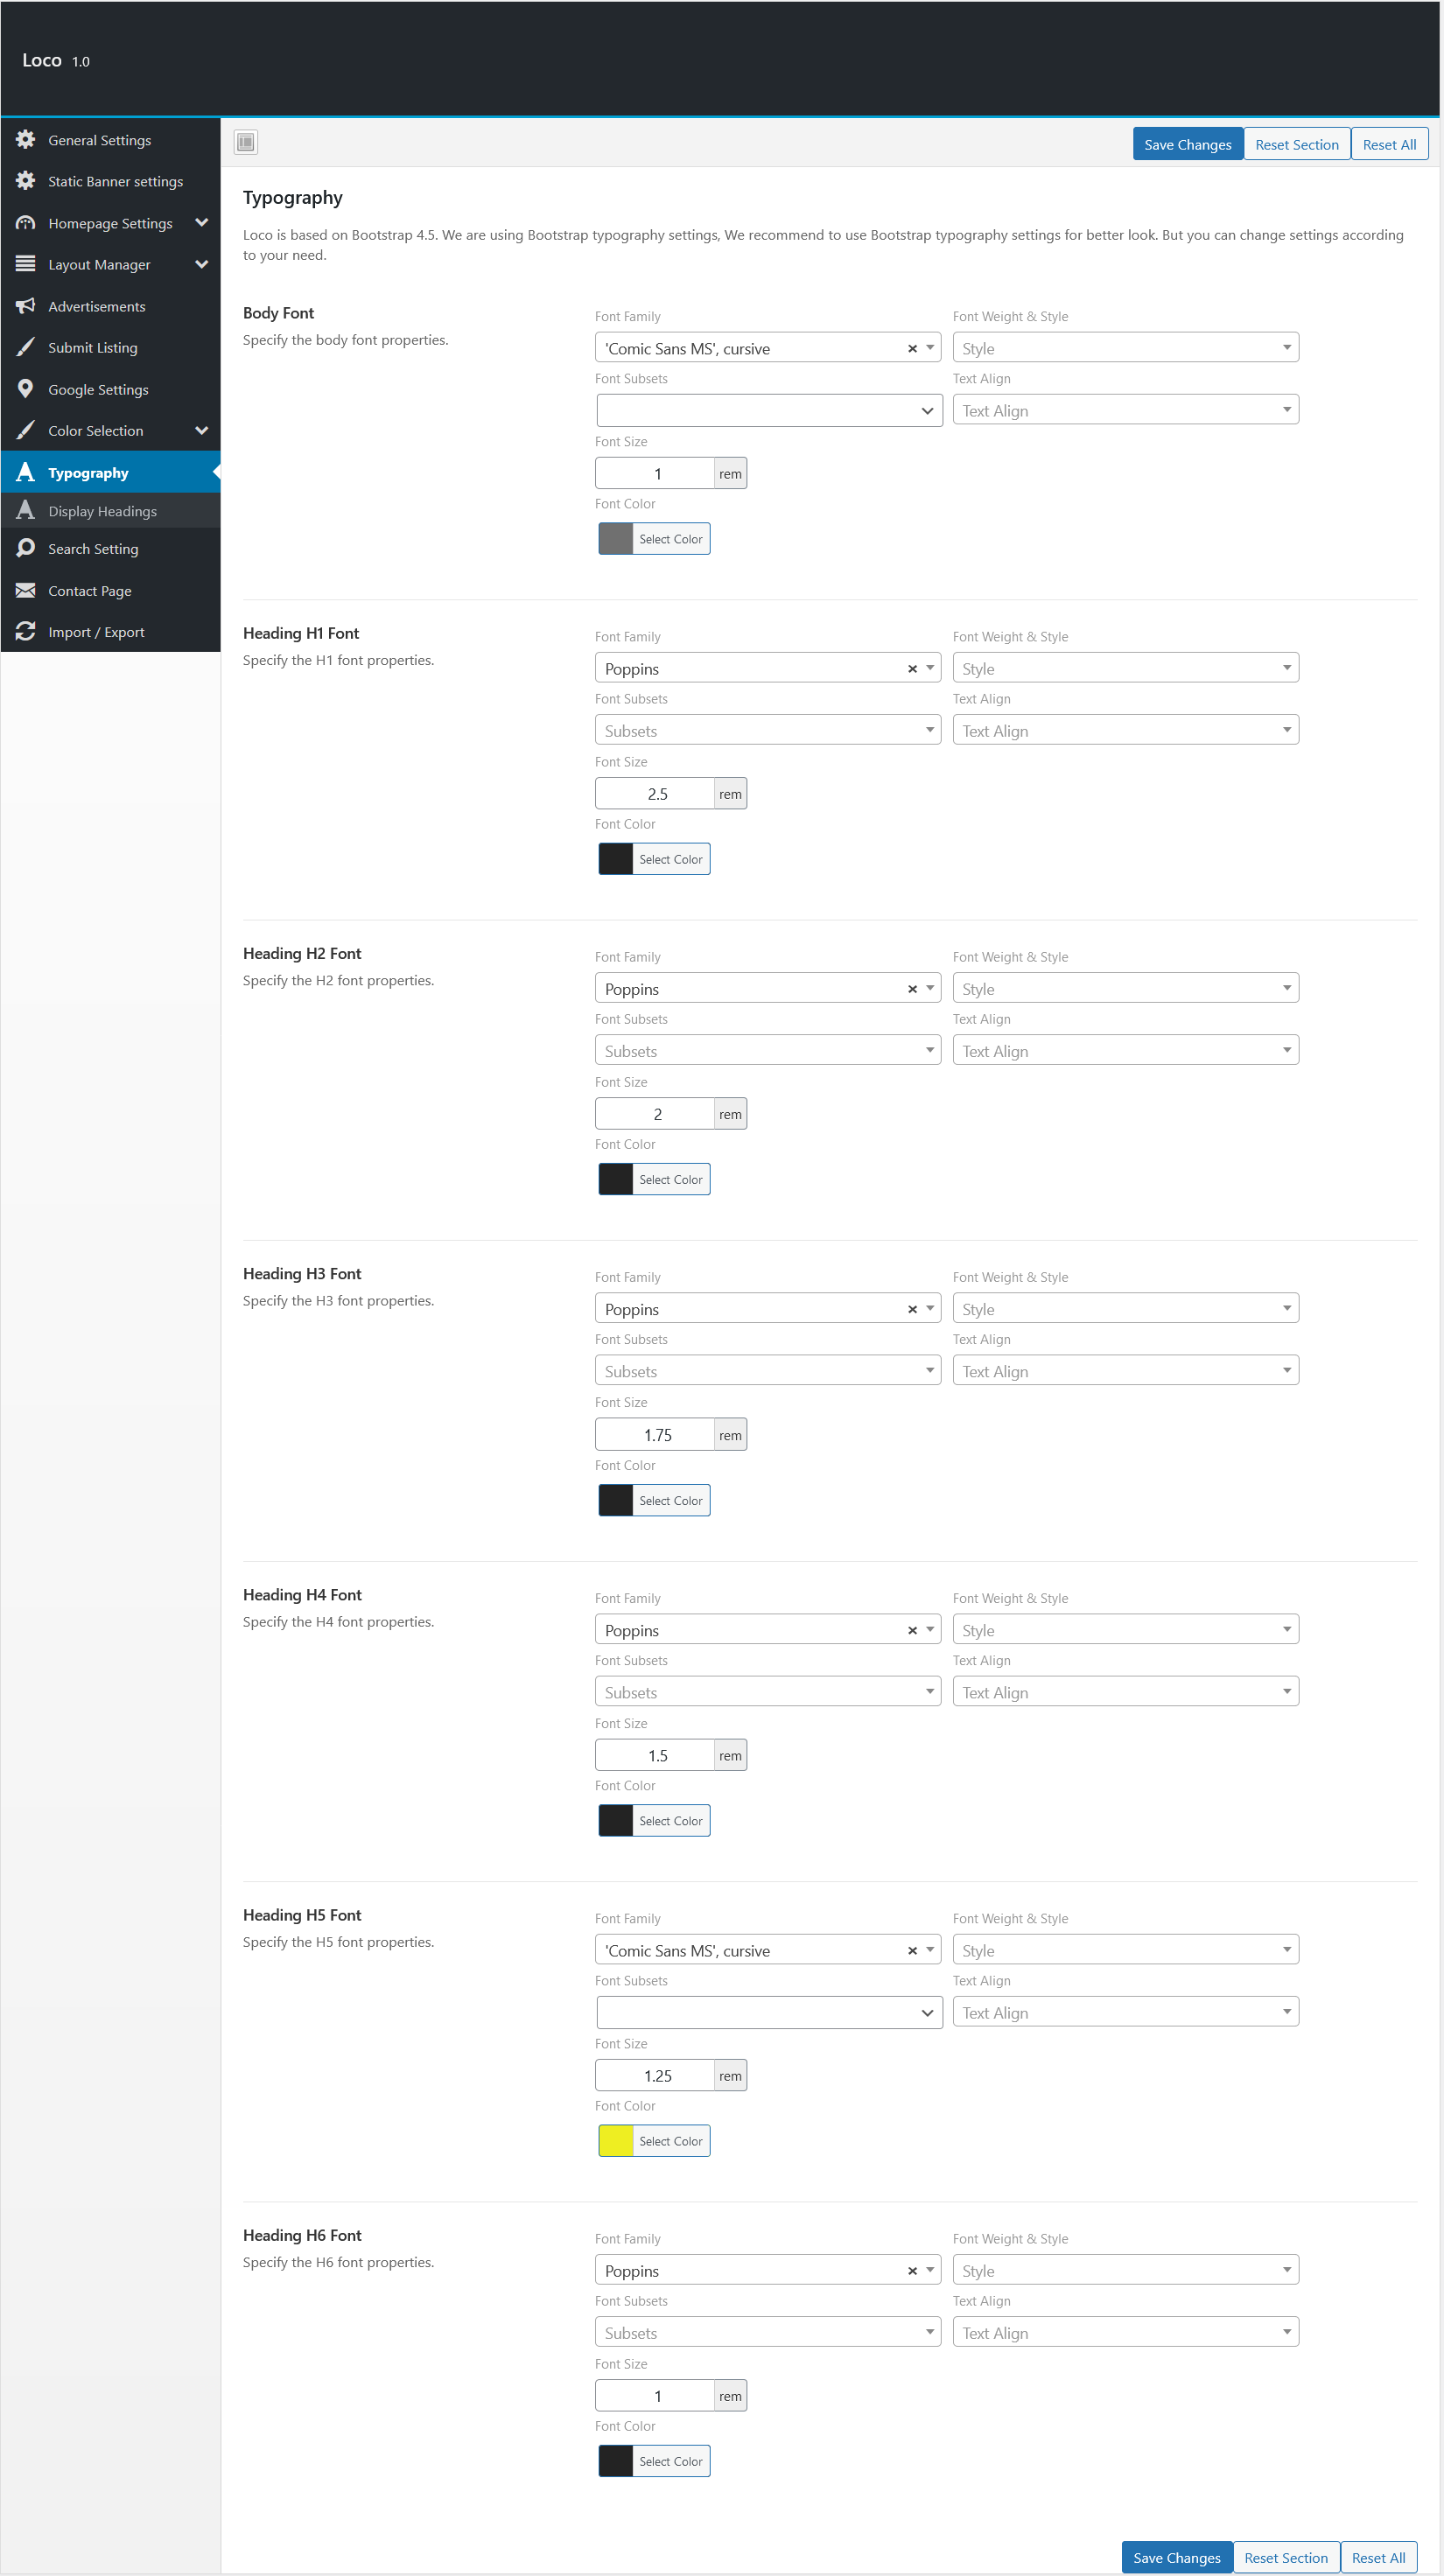
Typography
Loco is based on Bootstrap 4.5. We are using Bootstrap typography settings, We recommend to use Bootstrap typography settings for better look. But you can change settings according to your need. From here you can manage Body font and all heading font. For details have a look at this image.
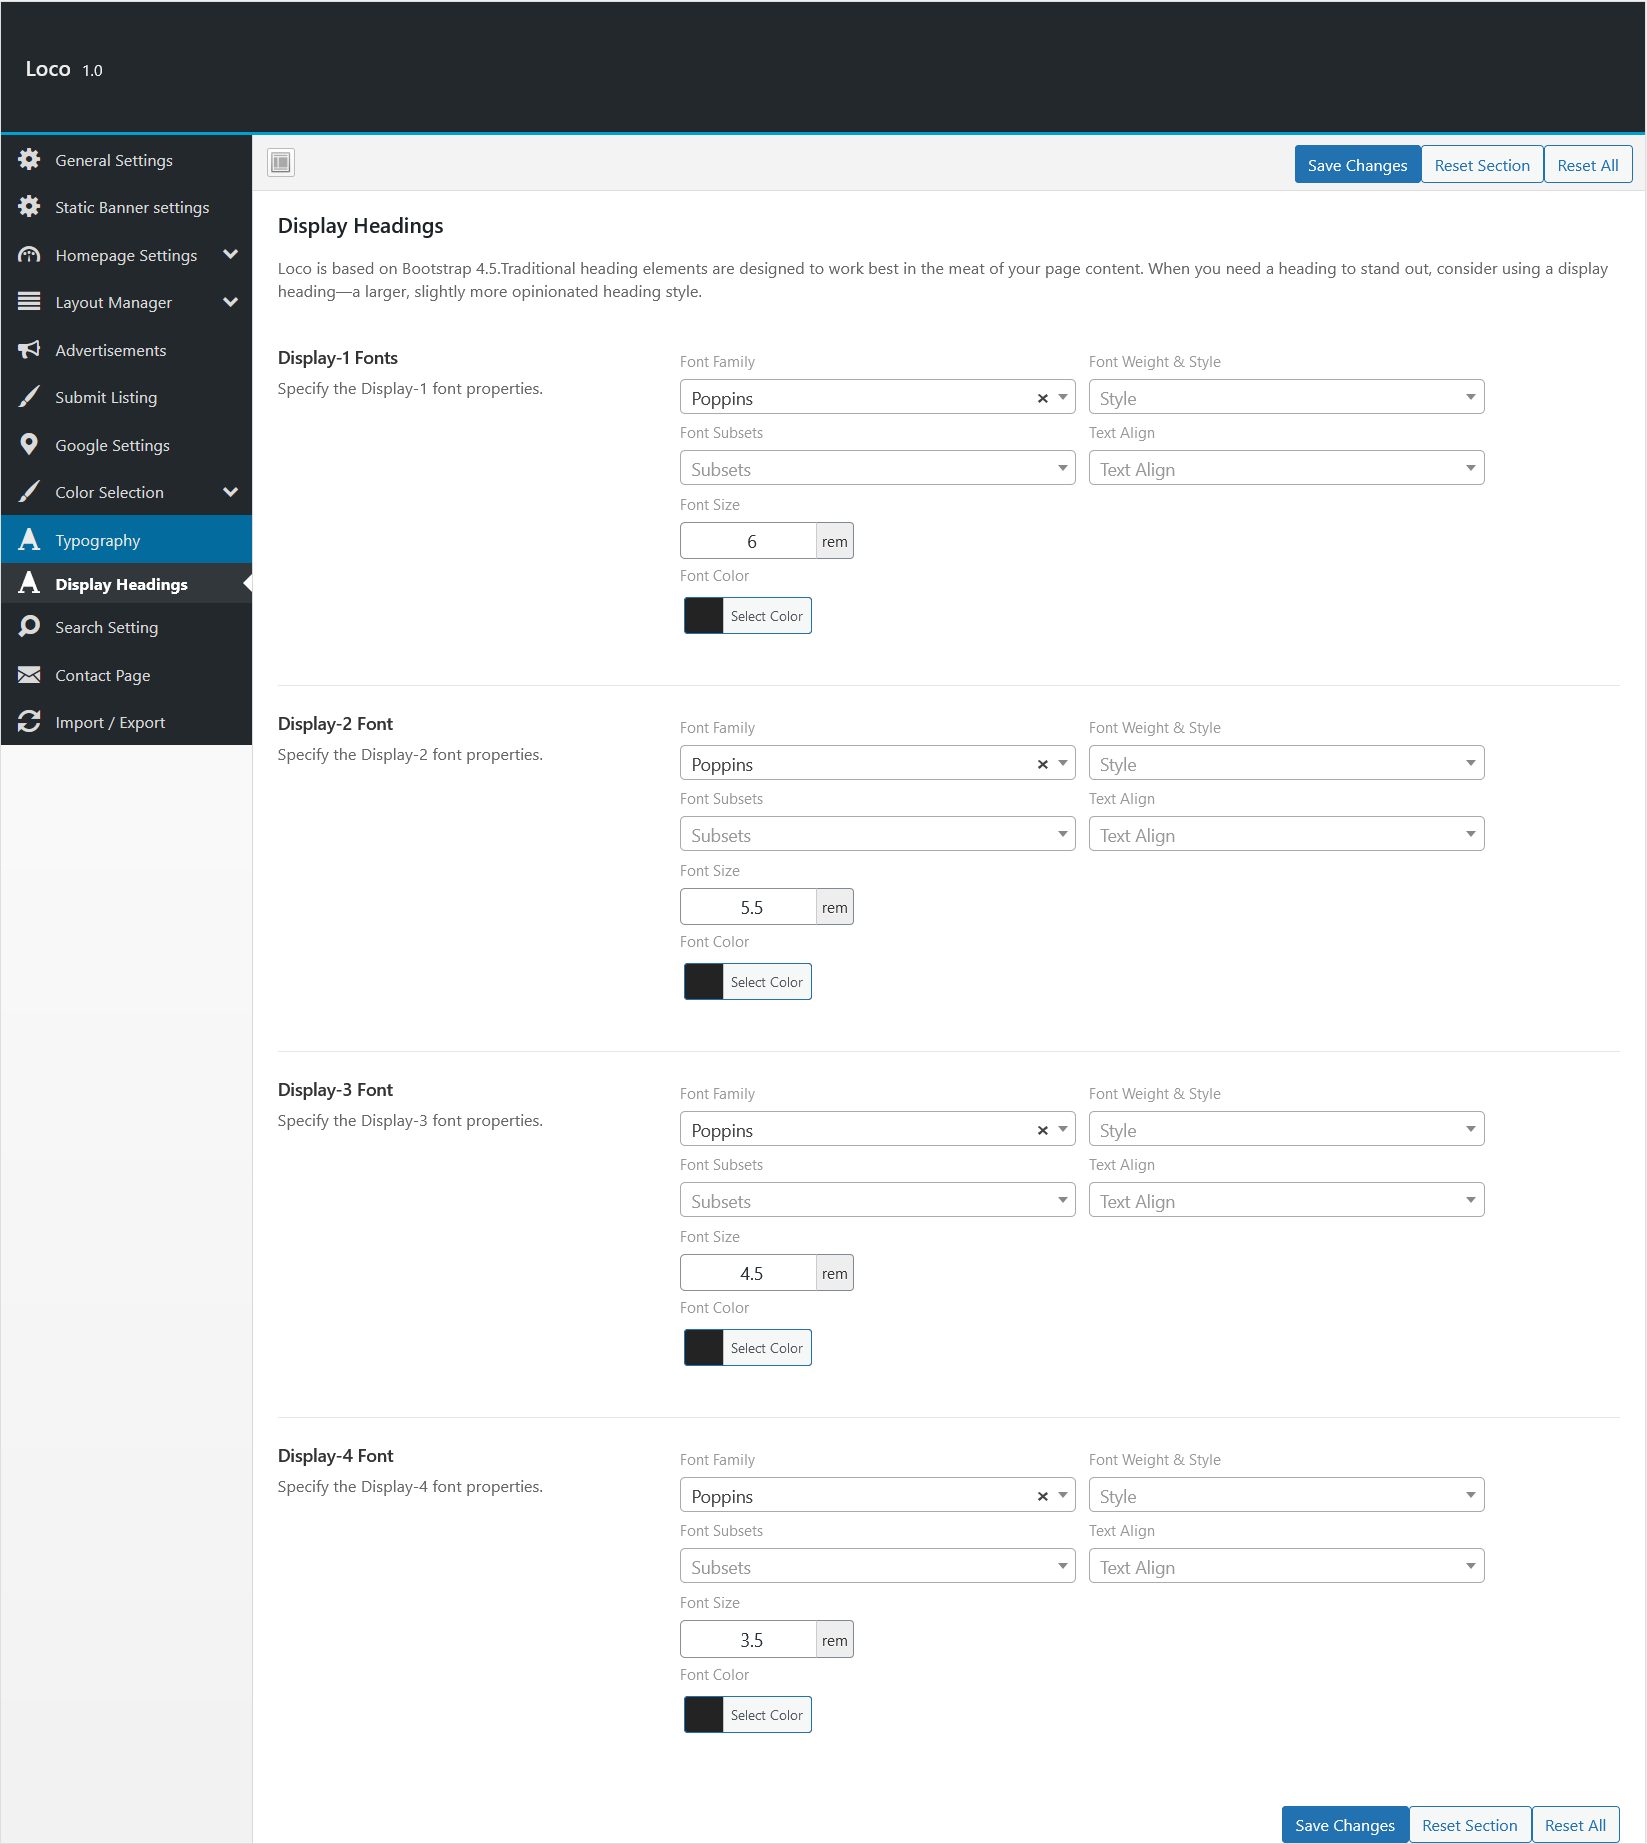
Display Headings
Loco is based on Bootstrap 4.5.Traditional heading elements are designed to work best in the meat of your page content. When you need a heading to stand out, consider using a display heading—a larger, slightly more opinionated heading style. For details have a look at this image.
Search Setting
For search settings you can manage your search results.
- Default search - You can search by listing tile or tags.
- Listing Count - How many results you want to shown on searh result page.
- Listing order - You can set Listing order by title, name, date or random.
- Listing order - You can manage ascending or descending order.

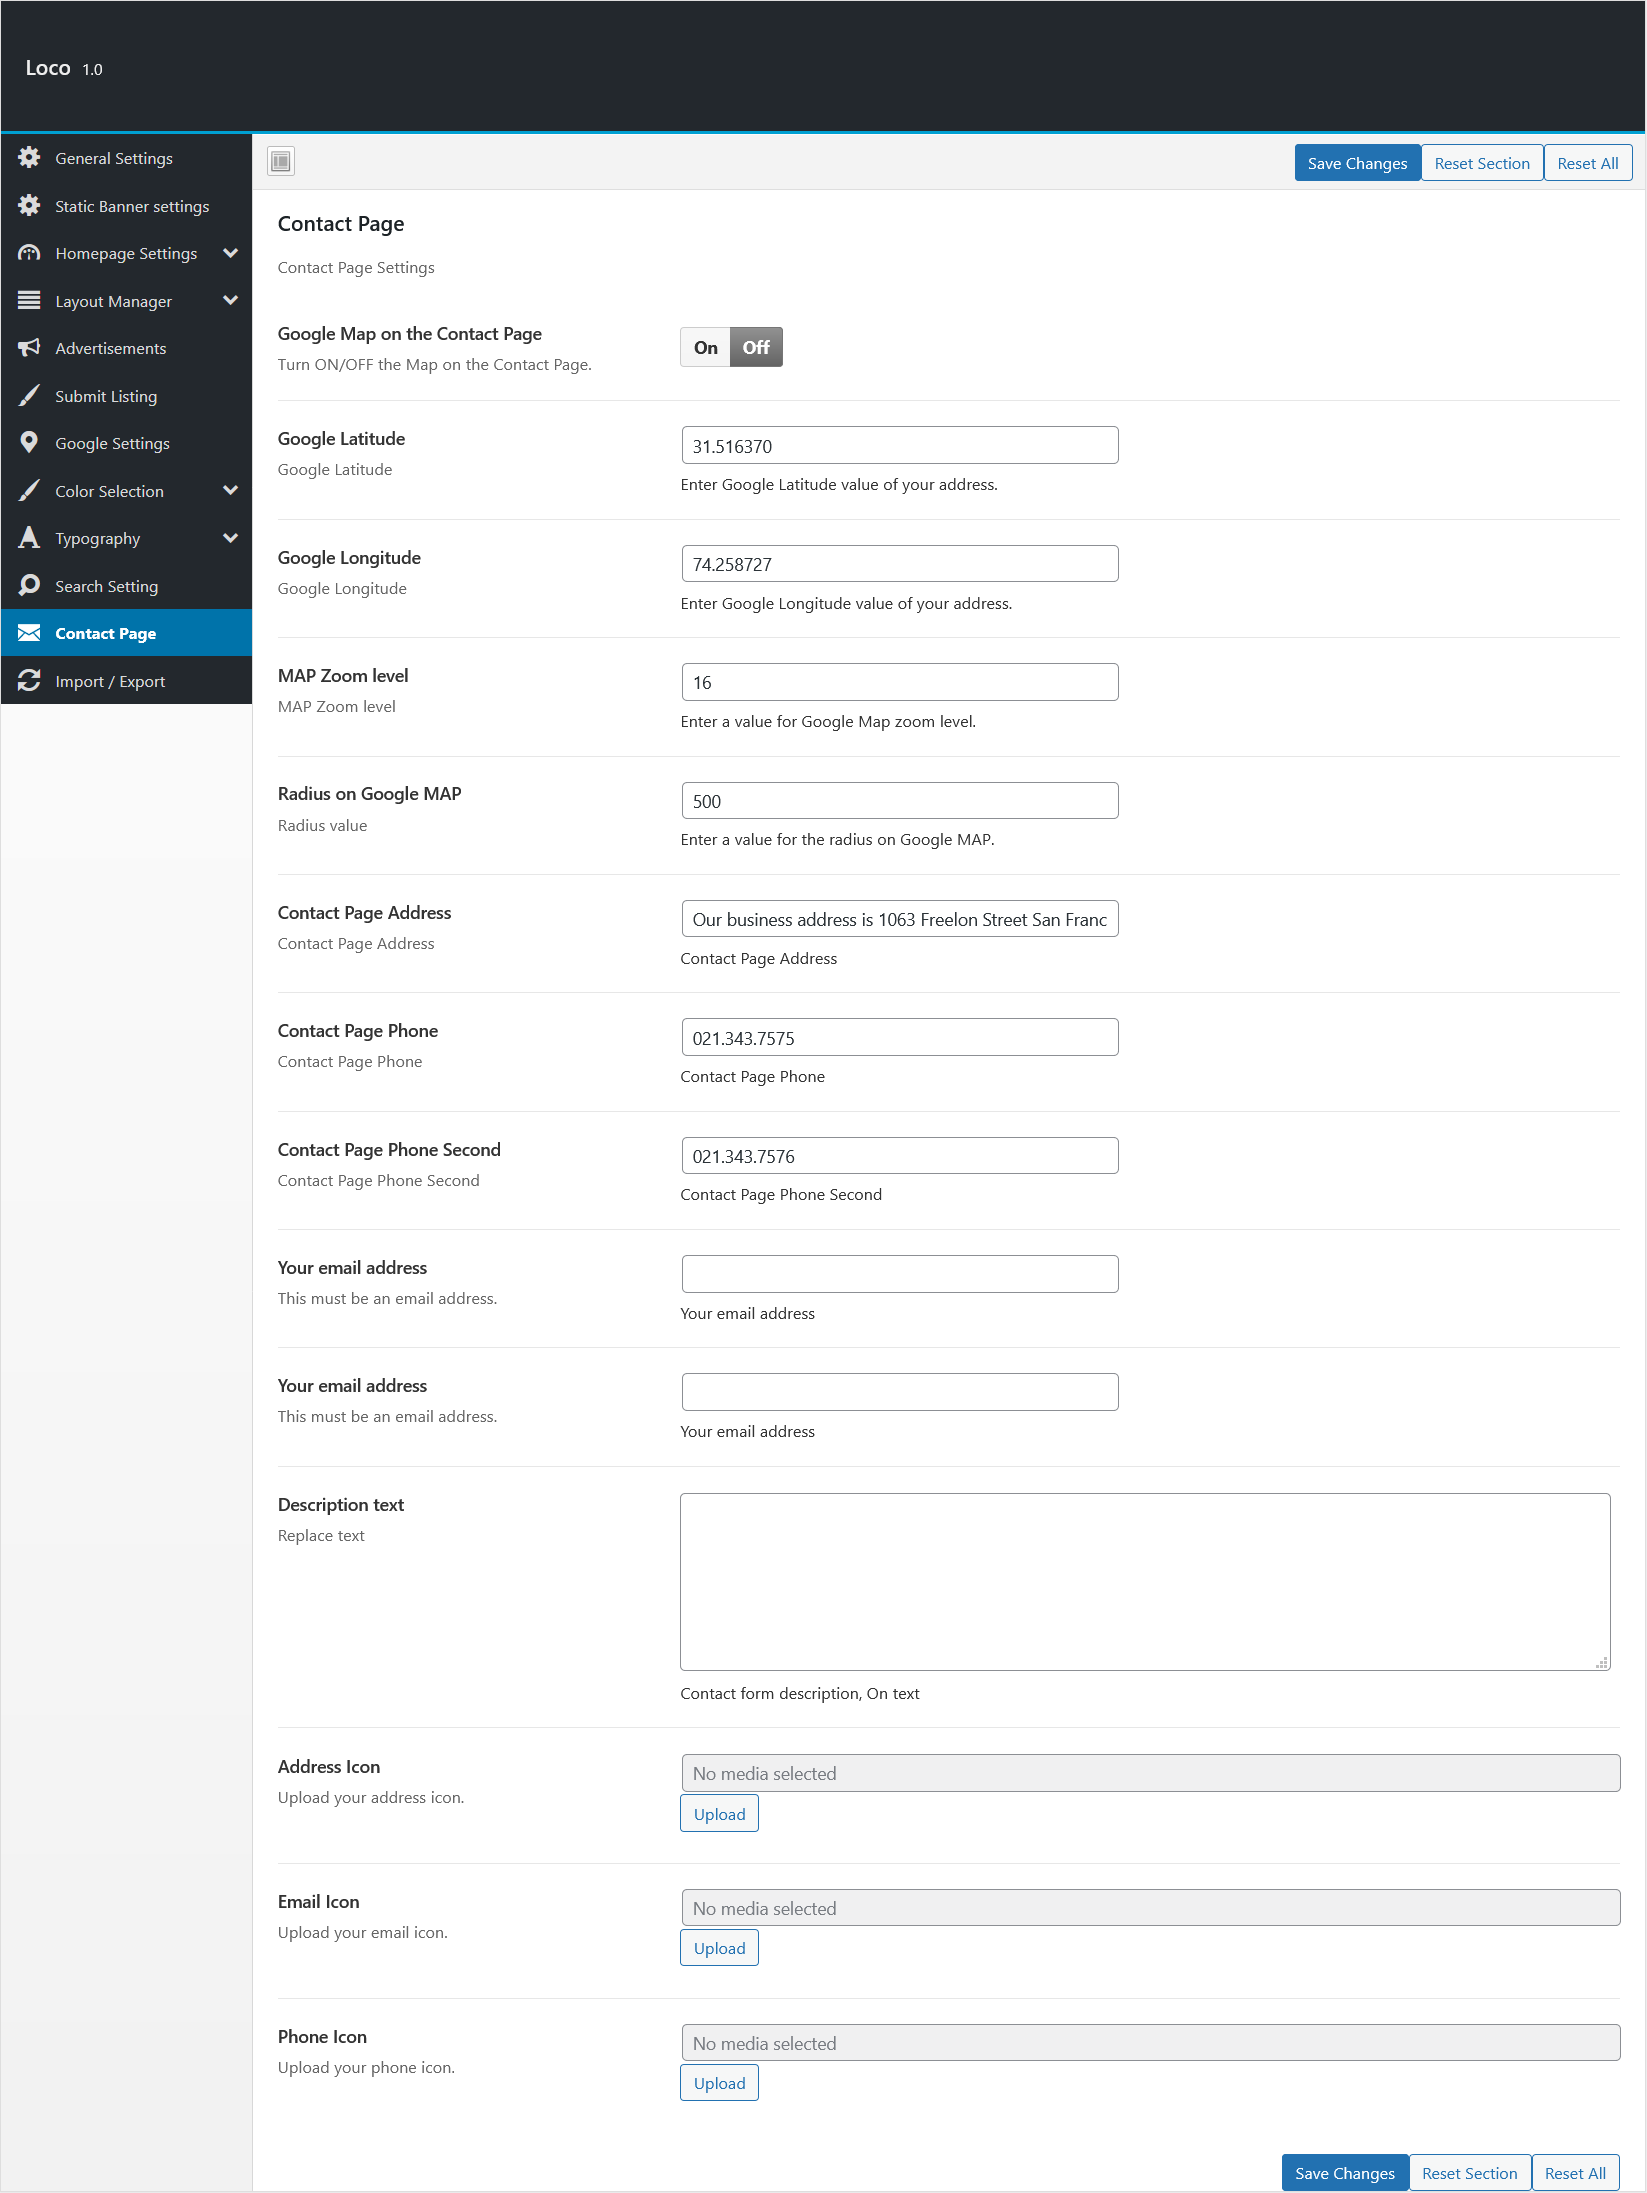
Contact Page
From contact page settings you can manage Google MAP onn contact page, and All Google Values.
You can Manage Address, Email, Phone number which you want to display on your contact page. Also you need to upload icons.
For details have a look at this image
Frequently Asked Questions
Q: All layouts designs are included in this price?
Ans: Yes all layouts are included in this price/package.
Q: Is there any other paid plugins required to run Loco theme?
Ans: No need to purchase any extra paid plugin.
Q: Did we need to hire a developer to install this theme?
Ans: No need to hire any developer, we offer free theme installation and free demo setup.
Some of your credits and sources
We would love to thank everybody for their great work and for letting us use the resources. All resources are GPL , Commercial licensed or we have written permission for usage.
None of the images and logo inside the demo are included inside the download package. The download package contains a single demo image and dummy logo image.
We are using these
- LayerSlider WP - Thanks to kreatura
- AccessPress Social Login Lite - Thanks to AccessPress Themes.
- Bootstrap - Thanks to getbootstrap
- ReduxFramework - Thanks to ReduxFramework
- WooCommerce - Thanks to Automattic
- One Click Demo Import - Thanks to ProteusThemes
Loco Theme Change-log
	= V 1.0 - 5 April 2019 =
	* Initial Release